
Table of contents
Introduction
The Bastion Host, or Jump Host concept, has historically been a traditional pattern for providing system administrators with external access to internal compute resources on distinct networks. An actor connects to a dedicated host in a DMZ by most commonly Secure Shell (SSH) or Remote Desktop Protocol (RDP), and from there gain access to compute resources on internal networks to perform system maintenance, apply patches, check content in a database , update schemas etc.
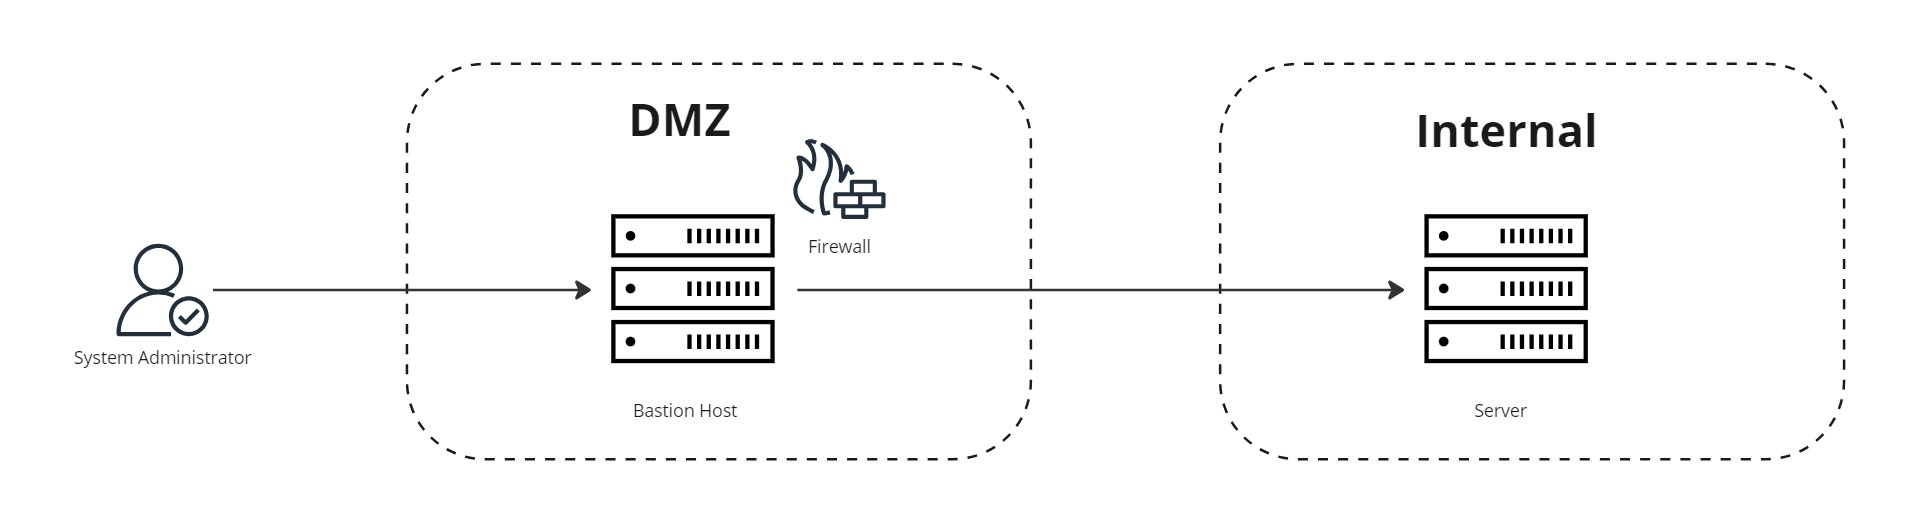
These Bastion Hosts must behighly secured to withstand attacks. Measures include hardened operating systems and server configurations, removing non-required services and libraries, firewalling and audit logging, but the reality is that many instances do not meet the recommended standards, either by lack of knowledge or configuration mistakes. One of the most common attack vectors is simply not locking down the firewall rules/security group rules to only permit access on relevant ports from trusted IP ranges, leaving SSH/RDP open to anyone (0.0.0.0/0) instead of your corporate gateway or VPN.
As mentioned in my post Protect your webapps from malicious traffic with AWS Web Application Firewall, 7 percent of EC2 instances, 3 percent of Azure VMs, and 13 percent of Google Cloud VMs are publicly exposed to the internet. Among instances that are publicly exposed, HTTP and HTTPS are the most commonly exposed ports, and are not considered risky in general. After these, SSH and RDP remote access protocols are common.
On July 2nd 2024 the critical vulnerability CVE-2024-6387, labeled regreSSHion, was announced, where an unauthenticated remote code execution in OpenSSH’s server (sshd) could grant full root access. With a vulnerability score of 9.8/10 this is one of the most serious bugs in OpenSSH in years.
The first thing to do is to stop exposing SSH/RDP, and then find alternative, more modern workflows for accessing cloud resources. Even if access is whitelisted from trusted IP address ranges, it’s a bad practice in 2024 to have direct access into production environments.
As stated in the AWS Well-Architected Framework – Security Pillar:
Use automation to perform deployment, configuration, maintenance, and investigative tasks wherever possible. Consider manual access to compute resources in cases of emergency procedures or in safe (sandbox) environments, when automation is not available.
Common anti-patterns
- Interactive access to Amazon EC2 instances with protocols such as SSH or RDP.
- Maintaining individual user logins such as
/etc/passwdor Windows local users.- Sharing a password or private key to access an instance among multiple users.
- Manually installing software and creating or updating configuration files.
- Manually updating or patching software.
- Logging into an instance to troubleshoot problems.
Removing the use of Secure Shell (SSH) and Remote Desktop Protocol (RDP) for interactive access reduces the scope of access to your compute resources. This takes away a common path for unauthorized actions.
SEC06-BP03 Reduce manual management and interactive access
For reference, the CIS AWS Foundations Benchmark has multiple controls when it comes to detecting public exposure of SSH/RDP. AWS Security Hub AWS Config and AWS Trusted Advisor can help you here.
- [EC2.53] EC2 security groups should not allow ingress from 0.0.0.0/0 to remote server administration ports
- This control checks whether an Amazon EC2 security group allows ingress from 0.0.0.0/0 to remote server administration ports (ports 22 and 3389). The control fails if the security group allows ingress from 0.0.0.0/0 to port 22 or 3389.
- [EC2.13] Security groups should not allow ingress from 0.0.0.0/0 or ::/0 to port 22
- This control checks whether an Amazon EC2 security group allows ingress from 0.0.0.0/0 or ::/0 to port 22. The control fails if the security group allows ingress from 0.0.0.0/0 or ::/0 to port 22.
- [EC2.21] Network ACLs should not allow ingress from 0.0.0.0/0 to port 22 or port 3389
- This control checks whether a network access control list (network ACL) allows unrestricted access to the default TCP ports for SSH/RDP ingress traffic. The control fails if the network ACL inbound entry allows a source CIDR block of ‘0.0.0.0/0’ or ‘::/0’ for TCP ports 22 or 3389.
Exploring alternative workflows
It’s encouraged to pivot from a classical systems administration approach and substitute interactive access with AWS Systems Manager capabilities.
Look into how you can automate runbooks and trigger maintenance tasks with AWS Systems Manager Automation documents.
Don’t perform changes in live systems, deploy EC2 compute resources using the immutable infrastructure pattern, as for container based workloads. Or, even better, containerize to AWS ECS Fargate/EKS.
If your use-case dictates interactive access; disable security group ingress rules for port 22/tcp (SSH) or port 3389/tcp (RDP) and leverage AWS SSM – Session Manager agent based access to EC2. You can also configure activity logging to Amazon CloudWatch Logs for a full audit trail. We will explore this workflow in the coming chapters.
Deploy sample infrastructure
For testing the described alternatives I have developed a sample Terraform module which deploys the following resources.
Well-Architected Virtual Private Cloud (VPC)
- Public subnets
- Private subnets with VPC endpoints
- Database subnets
- NAT Gateways
- VPC endpoints
locals {
  azs            = slice(data.aws_availability_zones.available.names, 0, 2)
  aws_account_id = data.aws_caller_identity.current.account_id
}

module "vpc" {
  source = "git::https://github.com/terraform-aws-modules/terraform-aws-vpc.git?ref=25322b6b6be69db6cca7f167d7b0e5327156a595"

  name             = var.name_prefix
  cidr             = var.vpc_cidr
  azs              = local.azs
  private_subnets  = [for k, v in local.azs : cidrsubnet(var.vpc_cidr, 8, k)]
  public_subnets   = [for k, v in local.azs : cidrsubnet(var.vpc_cidr, 8, k + 4)]
  database_subnets = [for k, v in local.azs : cidrsubnet(var.vpc_cidr, 8, k + 8)]

  create_database_subnet_group           = true
  create_database_subnet_route_table     = true
  create_database_internet_gateway_route = false

  manage_default_network_acl    = true
  manage_default_route_table    = true
  manage_default_security_group = true

  enable_dns_hostnames   = true
  enable_dns_support     = true
  enable_nat_gateway     = true
  single_nat_gateway     = false
  one_nat_gateway_per_az = true

  enable_flow_log                      = true
  create_flow_log_cloudwatch_log_group = true
  create_flow_log_cloudwatch_iam_role  = true
  flow_log_max_aggregation_interval    = 60

  vpc_tags = {
    Name = var.name_prefix
  }
}

module "vpc_endpoints" {
  source = "git::https://github.com/terraform-aws-modules/terraform-aws-vpc.git//modules/vpc-endpoints?ref=4a2809c673afa13097af98c2e3c553da8db766a9"

  vpc_id = module.vpc.vpc_id

  create_security_group      = true
  security_group_name_prefix = "${var.name_prefix}-vpc-endpoints-"
  security_group_description = "VPC endpoint security group"
  security_group_rules = {
    ingress_https = {
      description = "HTTPS from VPC"
      cidr_blocks = [module.vpc.vpc_cidr_block]
    }
  }

  endpoints = {
    dynamodb = {
      service         = "dynamodb"
      service_type    = "Gateway"
      route_table_ids = flatten([module.vpc.intra_route_table_ids, module.vpc.private_route_table_ids, module.vpc.public_route_table_ids])
      policy          = data.aws_iam_policy_document.dynamodb_endpoint_policy.json
      tags            = { Name = "dynamodb-vpc-endpoint" }
    },
    ecs = {
      service             = "ecs"
      private_dns_enabled = true
      subnet_ids          = module.vpc.private_subnets
    },
    ecs_telemetry = {
      create              = false
      service             = "ecs-telemetry"
      private_dns_enabled = true
      subnet_ids          = module.vpc.private_subnets
    },
    ecr_api = {
      service             = "ecr.api"
      private_dns_enabled = true
      subnet_ids          = module.vpc.private_subnets
      policy              = data.aws_iam_policy_document.generic_endpoint_policy.json
    },
    ecr_dkr = {
      service             = "ecr.dkr"
      private_dns_enabled = true
      subnet_ids          = module.vpc.private_subnets
      policy              = data.aws_iam_policy_document.generic_endpoint_policy.json
    },
    rds = {
      service             = "rds"
      private_dns_enabled = true
      subnet_ids          = module.vpc.private_subnets
      security_group_ids  = [module.db.security_group_id]
    },
    kms = {
      service             = "kms"
      private_dns_enabled = true
      subnet_ids          = module.vpc.database_subnets
    },
    ssm = {
      service             = "ssm"
      private_dns_enabled = true
      subnet_ids          = module.vpc.private_subnets
    },
    ssmmessages = {
      service             = "ssmmessages"
      private_dns_enabled = true
      subnet_ids          = module.vpc.private_subnets
    },
    ec2messages = {
      service             = "ec2messages"
      private_dns_enabled = true
      subnet_ids          = module.vpc.private_subnets
    }
  }

  tags = {
    Name = var.name_prefix
  }
}
RDS Aurora MySQL Multi-AZ cluster
module "db" {
  source = "git::https://github.com/terraform-aws-modules/terraform-aws-rds-aurora.git?ref=7d46e900b31322fd7a0ab0d7f67006ba4836c995"

  name            = "${var.name_prefix}-rds"
  engine          = "aurora-mysql"
  engine_version  = "8.0"
  master_username = "root"
  instances = {
    1 = {
      instance_class = "db.t3.medium"
    }
    2 = {
      instance_class = "db.t3.medium"
    }
  }
  vpc_id               = module.vpc.vpc_id
  db_subnet_group_name = module.vpc.database_subnet_group_name
  security_group_rules = {
    ingress = {
      source_security_group_id = aws_security_group.private_access.id
    }
    ingress = {
      source_security_group_id = data.aws_security_group.cloud9_security_group.id
    }
    kms_vpc_endpoint = {
      type                     = "egress"
      from_port                = 443
      to_port                  = 443
      source_security_group_id = module.vpc_endpoints.security_group_id
    }
  }

  tags = {
    Name           = var.name_prefix
    Environment    = "dev"
    Classification = "internal"
  }

  manage_master_user_password_rotation              = true
  master_user_password_rotation_schedule_expression = "rate(7 days)"
}
EC2 Amazon Linux instance and security group
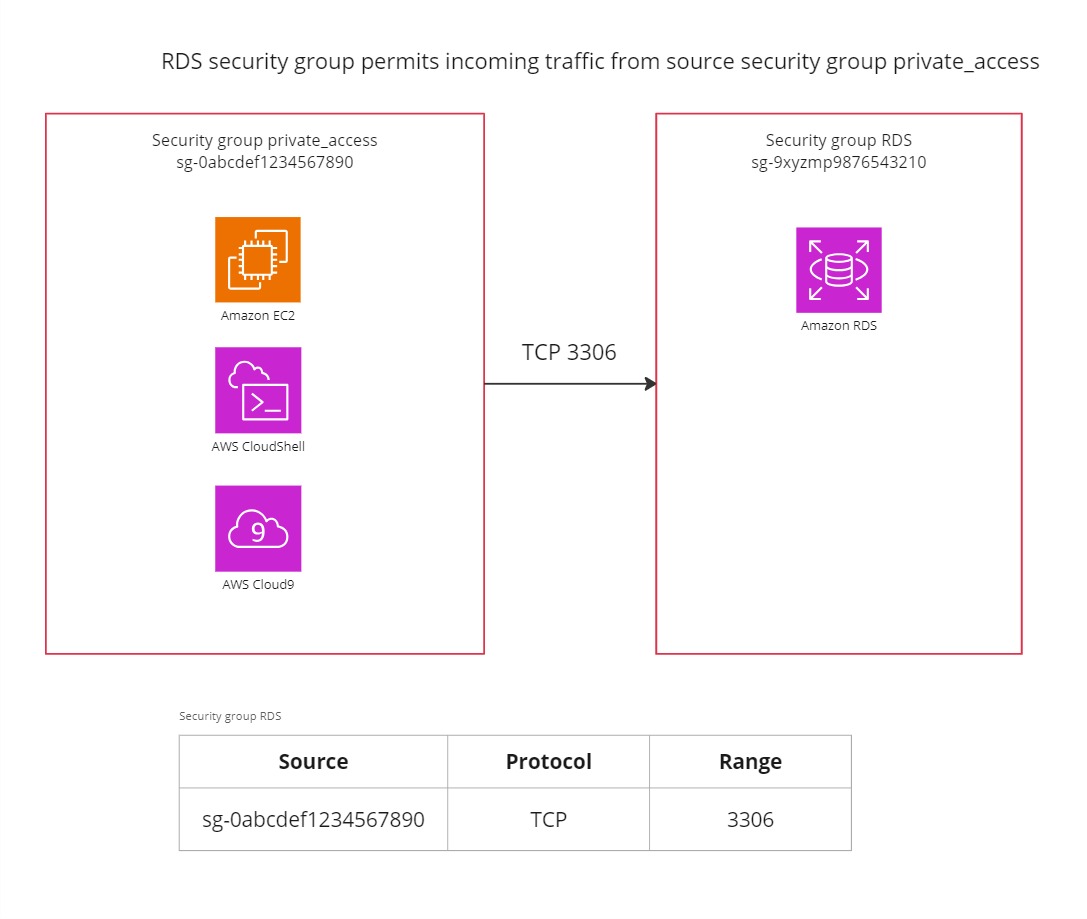
The Security Group for RDS is provisioned within the module. One placeholder security group labeled “private_access” is defined for EC2 and CloudShell purposes which only permits egress traffic. It is referenced in the RDS cluster security group to permit incoming connections on port 3306 for MySQL. This is called security group referencing and allows for dynamic configurations, instead of specifying static CIDR ranges, which often are too permissive.
data "aws_ami" "amazon_linux_23" {
  most_recent = true
  owners      = ["amazon"]

  filter {
    name   = "name"
    values = ["al2023-ami-2023*-x86_64"]
  }
}

module "ec2_instance" {
  source = "git::https://github.com/terraform-aws-modules/terraform-aws-ec2-instance.git?ref=4f8387d0925510a83ee3cb88c541beb77ce4bad6"

  name                        = "${var.name_prefix}-ec2"
  ami                         = data.aws_ami.amazon_linux_23.id
  create_iam_instance_profile = true
  iam_role_description        = "IAM role for EC2 instance and SSM access"
  iam_role_policies = {
    AmazonSSMManagedInstanceCore = "arn:aws:iam::aws:policy/AmazonSSMManagedInstanceCore"
  }
  instance_type          = "t2.micro"
  vpc_security_group_ids = [aws_security_group.private_access.id]
  subnet_id              = element(module.vpc.private_subnets, 0)

  # Enforces IMDSv2
  metadata_options = {
    "http_endpoint" : "enabled",
    "http_put_response_hop_limit" : 1,
    "http_tokens" : "required"
  }

  tags = {
    Name        = "${var.name_prefix}-ec2"
    Environment = "dev"
  }
}

resource "aws_security_group" "private_access" {
  #checkov:skip=CKV2_AWS_5: Placeholder security group, to be assigned to applicable resources, but beyond scope of this module.
  name_prefix = "${var.name_prefix}-private-access"
  description = "Security group for private access from local resources. Permits egress traffic."
  vpc_id      = module.vpc.vpc_id

  egress {
    description = "Permit egress TCP"
    from_port   = 0
    to_port     = 65535
    protocol    = "tcp"
    cidr_blocks = ["0.0.0.0/0"]
  }
  egress {
    description = "Permit egress UDP"
    from_port   = 0
    to_port     = 65535
    protocol    = "udp"
    cidr_blocks = ["0.0.0.0/0"]
  }
  egress {
    description = "Permit egress ICMP"
    from_port   = -1
    to_port     = -1
    protocol    = "icmp"
    cidr_blocks = ["0.0.0.0/0"]
  }

  tags = {
    Name = "${var.name_prefix}-sg-private-access"
  }
}
AWS Cloud9 SSM Managed Instance
The data property for the security group makes it possible to identity the security group provisioned by AWS Cloud9. This is added in an ingress rule for the RDS cluster, as previously defined.
resource "aws_cloud9_environment_ec2" "cloud9_ssm_instance" {
  name                        = "${var.name_prefix}-cloud9"
  instance_type               = "t2.micro"
  automatic_stop_time_minutes = 30
  image_id                    = "amazonlinux-2023-x86_64"
  connection_type             = "CONNECT_SSM"
  subnet_id                   = element(module.vpc.private_subnets, 0)
  owner_arn                   = length(var.cloud9_instance_owner_arn) > 0 ? var.cloud9_instance_owner_arn : null
}

data "aws_security_group" "cloud9_security_group" {
  filter {
    name = "tag:aws:cloud9:environment"
    values = [
      aws_cloud9_environment_ec2.cloud9_ssm_instance.id
    ]
  }
}
For a fully working code repository along with setup instructions, see https://github.com/haakond/terraform-aws-bastion-host-alternatives/blob/main/examples/main.tf and https://github.com/haakond/terraform-aws-bastion-host-alternatives/blob/main/README.md.
Alternative 1: AWS Systems Manager – Session Manager
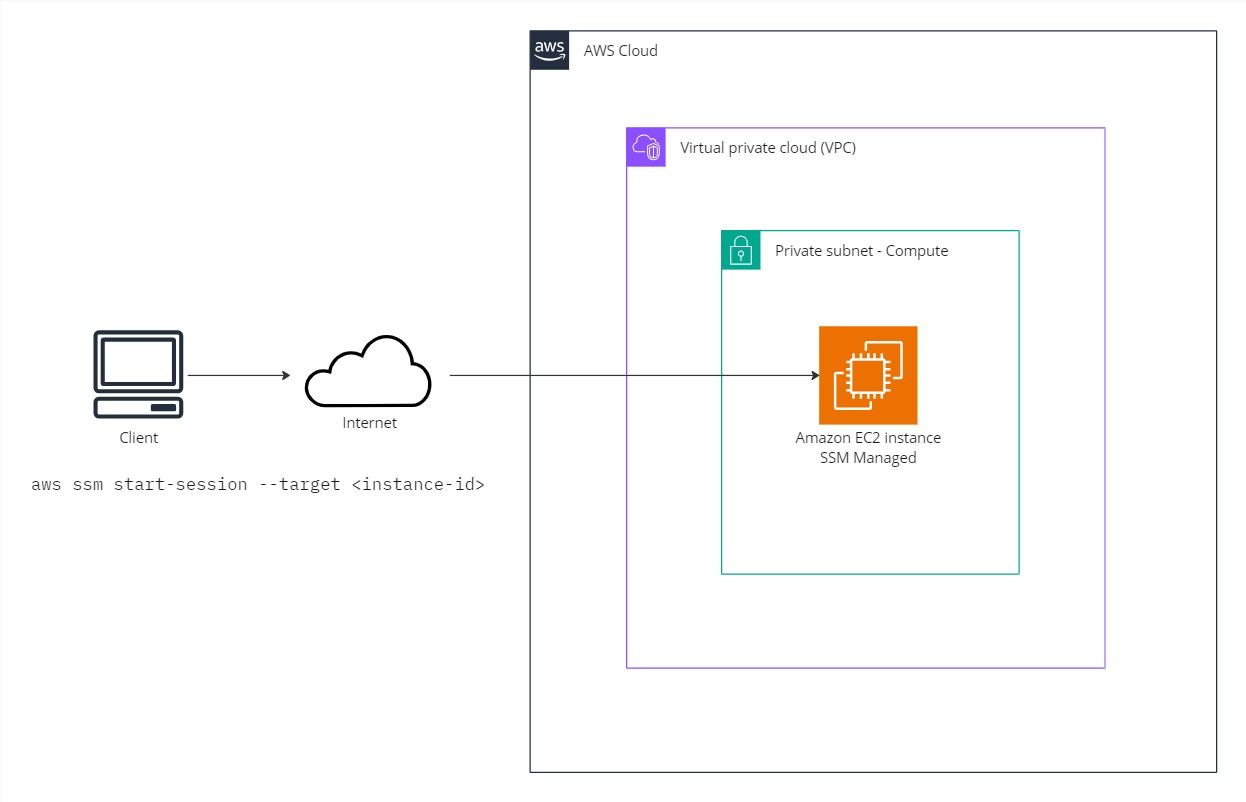
With AWS Systems Manager – Session Manager, you can manage your Amazon Elastic Compute Cloud (Amazon EC2) instances, edge devices, on-premises servers, and virtual machines (VMs). Port forwarding is also supported to connect to remote hosts in private subnets.
You can use either an interactive one-click browser-based shell or the AWS Command Line Interface (AWS CLI). Session Manager provides secure and auditable node management without the need to open inbound ports, maintain bastion hosts, or manage SSH keys. Session Manager supports Linux, Windows and macOS and session activity can be logged with AWS CloudTrail and Amazon CloudWatch Logs.
Session Manager can be configured to log entered commands and their output during a session, which can be used for generating reports or audit situations.
Note: AWS Systems Manager also provides an option with EC2 Instance Connect Endpoints, but this is based on SSH.
The coming two examples are based on this access pattern.
Prerequisites
- Supported operating system
- AWS Systems Manager SSM agent installed
- Connectivity to endpoints ec2messages, ssm and ssmmessages in the current region
- IAM service role permissions AmazonSSMManagedInstanceCore or equivalent
- Optional: Install the Session Manager plugin for the AWS CLI
Connecting to an EC2 instance in a private subnet from the AWS Console
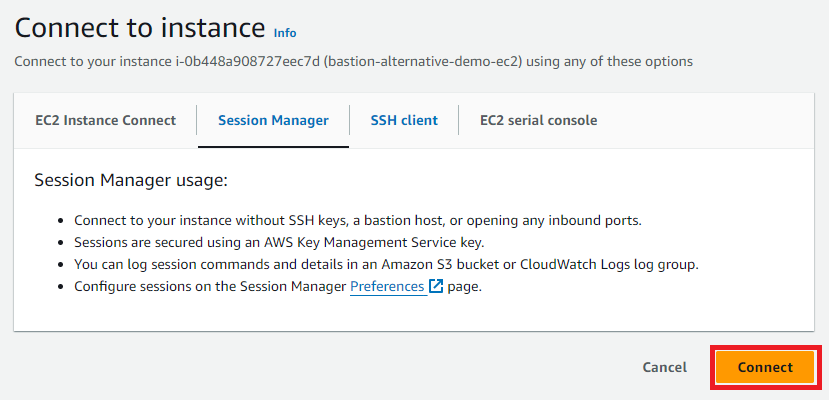
There are two optional starting points in the AWS Console, either from the AWS Systems Manager – Session Manager or directly from the EC2 instances list. The EC2 approach is usually the fastest and most convenient. With the prerequisites in order, find the instance you want to connect to, hit Connect.

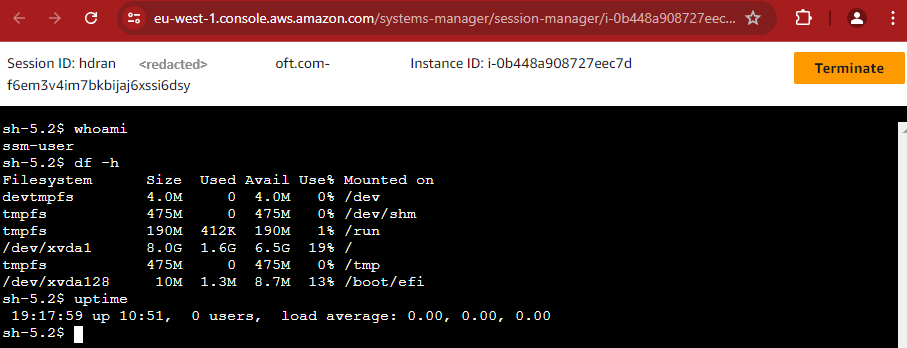
Ensure the tab with the option Session Manager is chosen and click Connect again.
I am now logged in and authenticated with my Federated AWS IAM Identity Center method and we have full traceability.
Connecting to an EC2 instance in a private subnet from your local workstation with the AWS CLI and AWS IAM Identity Center
In this example Microsoft Entra ID is the identity provider and federation is configured with AWS IAM Identity Center for modern user management. Do yourself a favor and get rid of those IAM users with static access keys.
To authorize your workstation based on Linux, macOS or Windows Subsystem for Linux, ensure you have the latest version of the AWS CLI installed.
Run aws configure sso and follow the instructions to obtain a valid session based on a browser where you’re currently logged in. For a full step by step guide see https://docs.aws.amazon.com/cli/latest/userguide/sso-configure-profile-token.html#sso-configure-profile-token-auto-sso.
You should now be logged in and have chosen the relevant AWS account and role to assume.
To confirm I run the following AWS cli command to get a list of EC2 instances including the Name tag value. One instance is returned.
aws ec2 describe-instances --query 'Reservations[].Instances[].[InstanceId, Tags[?Key==Name].Value[]]' --output=json

[
    [
        [
            "i-0b448a908727eec7d",
            [
                "bastion-alternative-demo-ec2"
            ]
        ]
    ]
]
Connecting to the instance is as simple as:
aws ssm start-session --target i-0b448a908727eec7d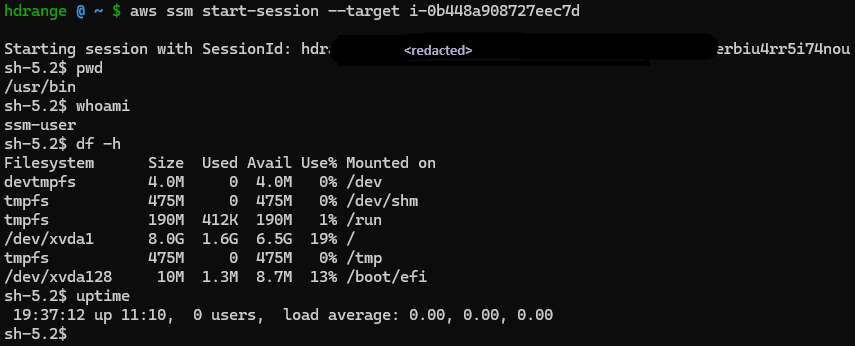
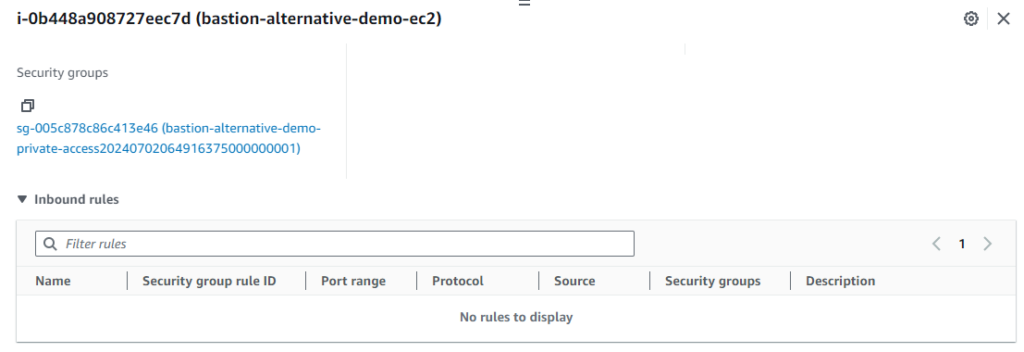
Type exit to terminate the session. There you go, CLI or Console based access with a security group with no inbound rules.
Connecting to an RDS cluster in a private database subnet with local port forwarding
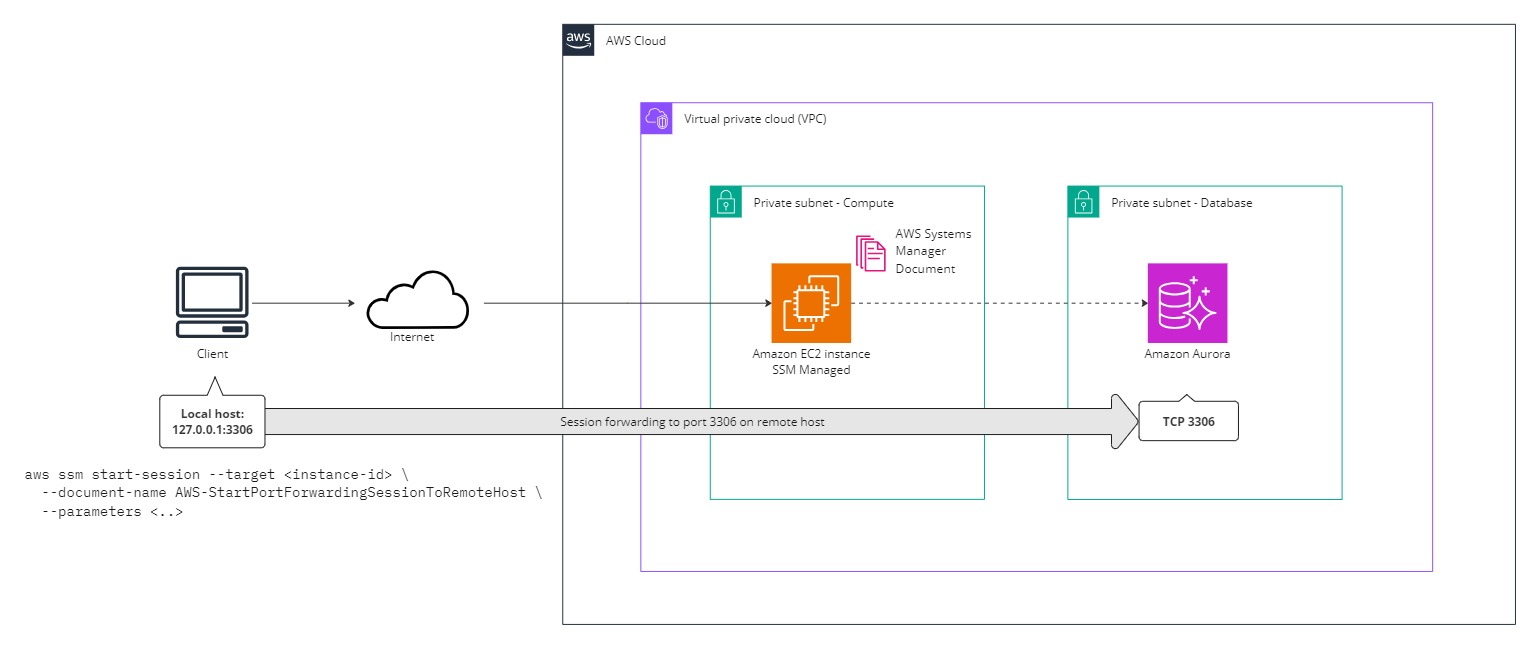
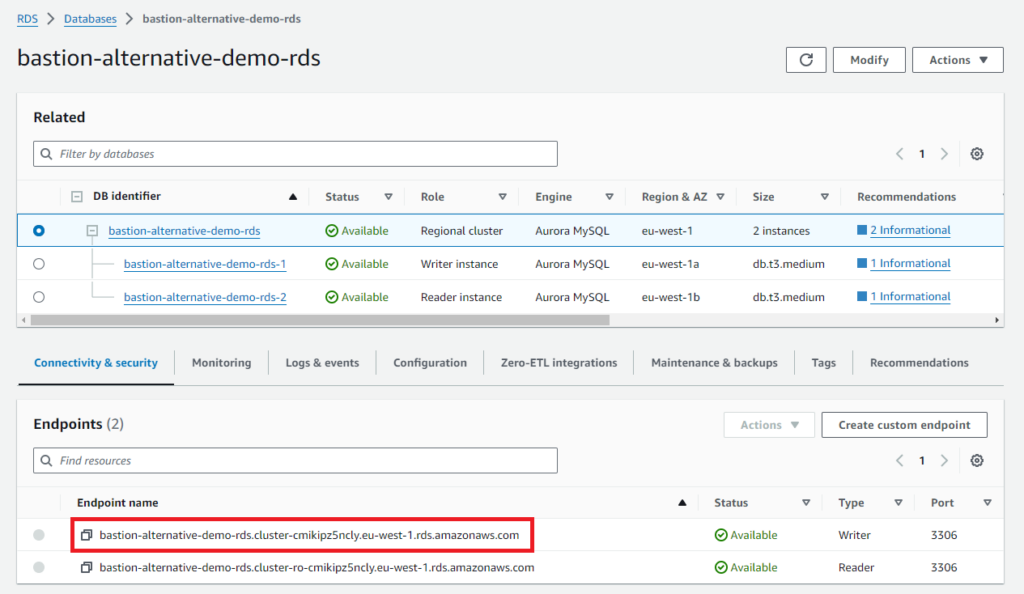
As with the previous example, establish a session with aws configure sso and identify the EC2 instance you would like to use as proxy. In this example we use the same one. To find the RDS cluster writer endpoint name you can issue the following command:
aws rds describe-db-clusters \
  --query 'DBClusters[?starts_with(DBClusterIdentifier, `bastion-alternative-demo`)].DBClusterIdentifier' \
  --output text | xargs -I {} aws rds describe-db-cluster-endpoints \
  --db-cluster-identifier {} \
  --query 'DBClusterEndpoints[?EndpointType==`WRITER`].Endpoint' \
  --output text
Alternatively, in the AWS Console navigate to RDS and copy the Writer Endpoint name, FQDN.
Execute the following command to start a port forwarding session which should provide MySQL connectivity to port 3306 on your local machine:
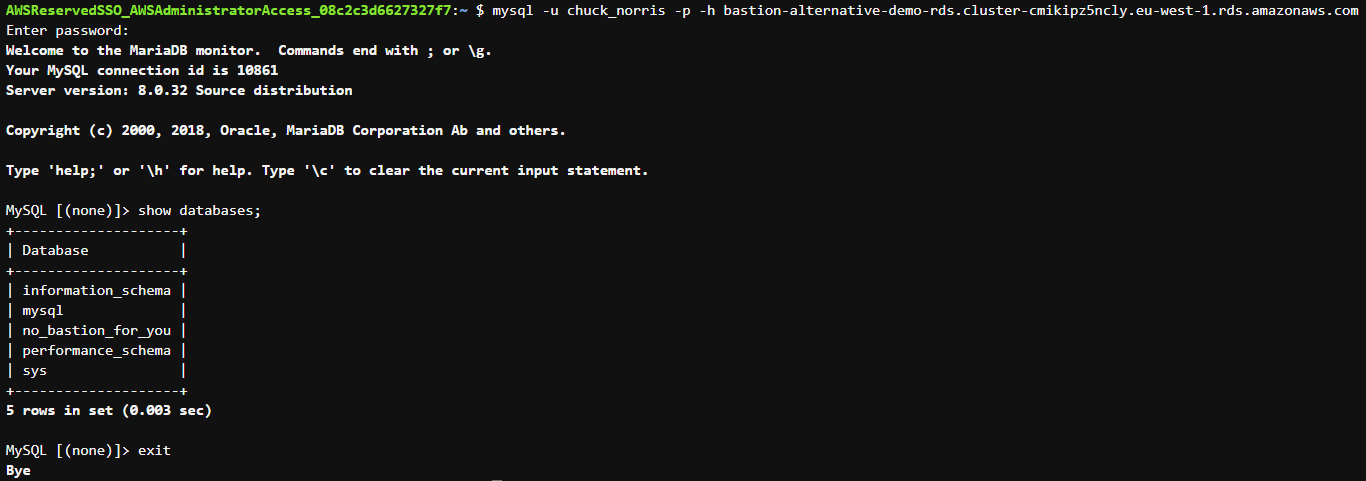
aws ssm start-session --target i-0b448a908727eec7d --document-name AWS-StartPortForwardingSessionToRemoteHost --parameters '{"portNumber":["3306"],"localPortNumber":["3306"],"host":["bastion-alternative-demo-rds.cluster-cmikipz5ncly.eu-west-1.rds.amazonaws.com"]}'The main difference is that this time the aws ssm start-session command will trigger an AWS Systems Managed Document called “AWS-StartPortForwardingSessionToRemoteHost” and we supply desired parameters. For demonstration the Terraform module has provisioned an RDS Aurora MySQL cluster in private database subnets.

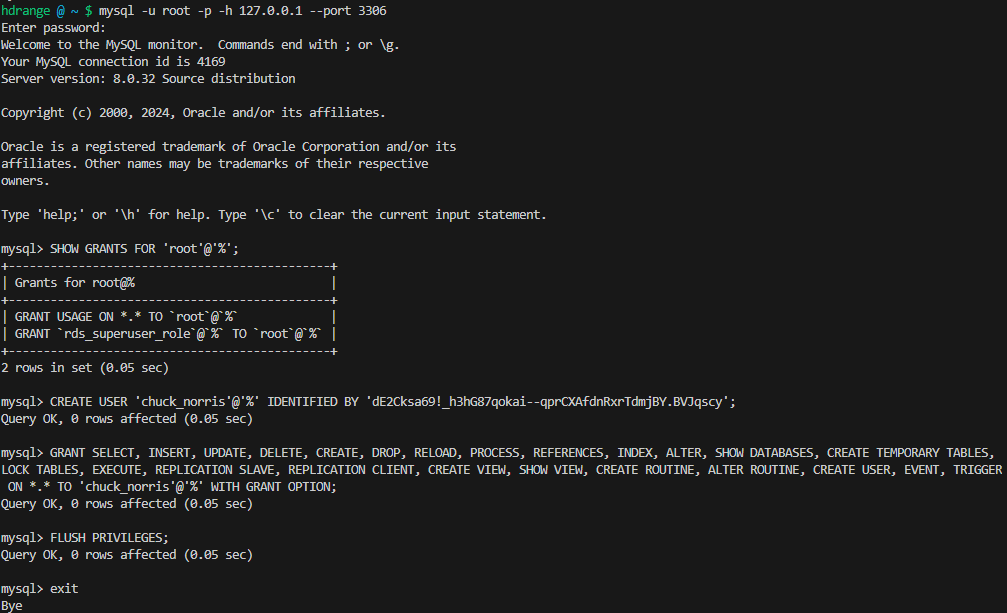
The command outputs “Starting session with SessionId (..) Port 3306 opened, Waiting for connections.
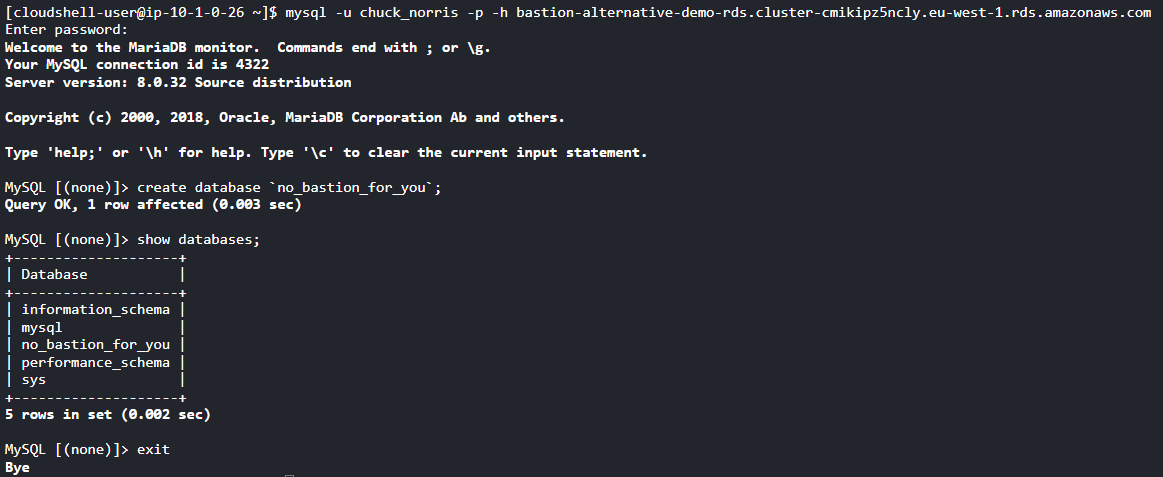
In another terminal I run mysql -y root -p -h 127.0.0.1 --port 3306 and take the opportunity to create a new privileged mysql user called chuck_norris.
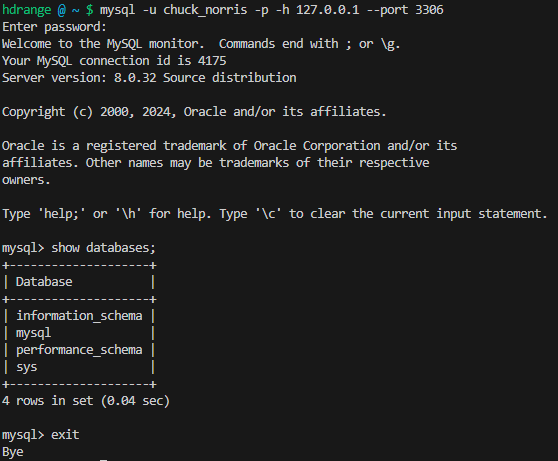
Verified working as expected.
If you prefer to use a GUI client like MySQL Workbench or HeidiSQL configure it to connect on localhost port 3306. If you run a development database server locally you probably would like to configure port forwarding to a different port.
Alternative 2: AWS CloudShell VPC Environment
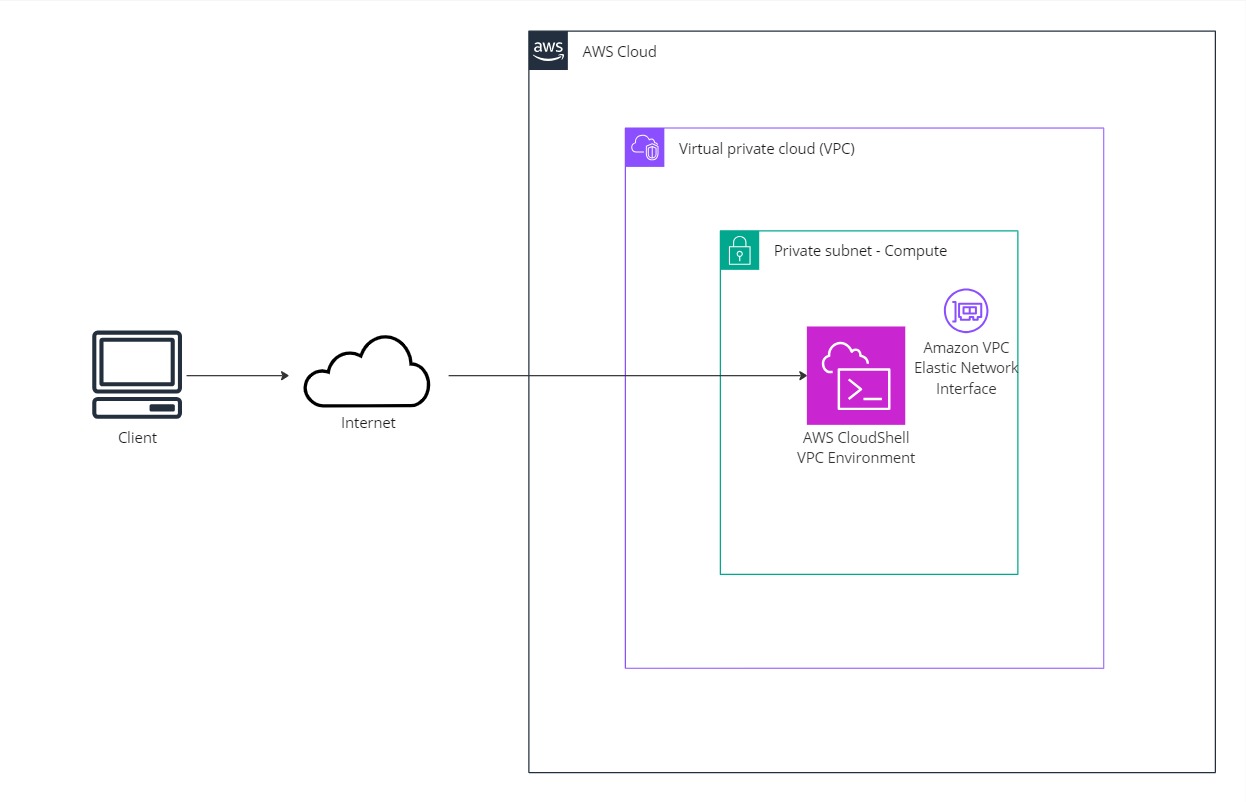
AWS CloudShell is a browser-based shell that is pre-authenticated with your console credentials which makes it easy to securely manage, explore and interact with AWS resources. Common development tools related to AWS are also pre-installed.
AWS announced VPC Environment support for AWS CloudShell on June 26th 2024. This enables the possibility to use CloudShell securely within the same subnet as other resources in your VPCs without the need for additional network configuration. Before this there was no means to control the network flow.
One caveat is that AWS CloudShell VPC environment does not support persistent storage, as the regular CloudShell feature has. Storage is ephemeral and data and home directories are deleted when an active environment ends, so you have to ensure data you care about is saved in Amazon S3 or another relevant persistent store. In my opinion, from a security perspective, auto-cleanup is a positive thing.
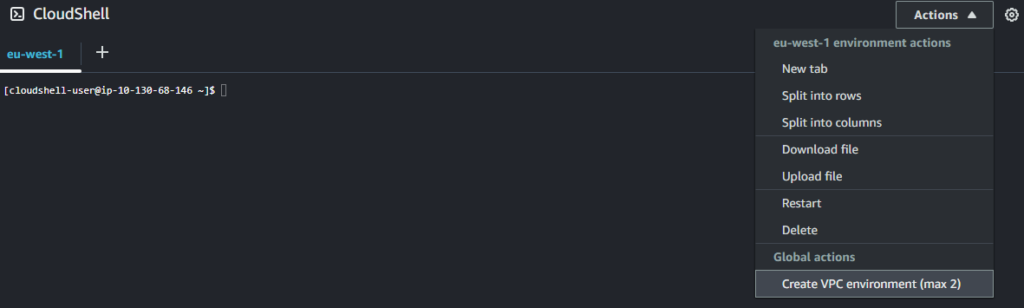
Open Cloudshell from the main AWS Services search box or the logo icon:
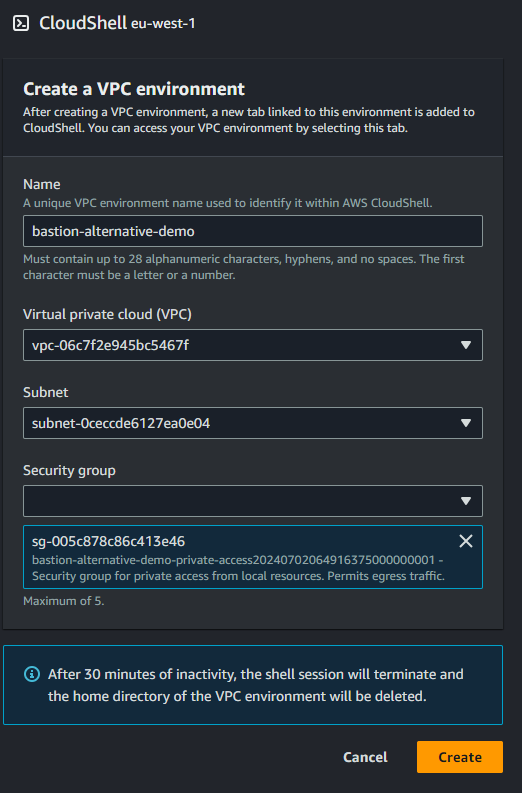
We choose the pre-provisioned VPC, subnet and security group:
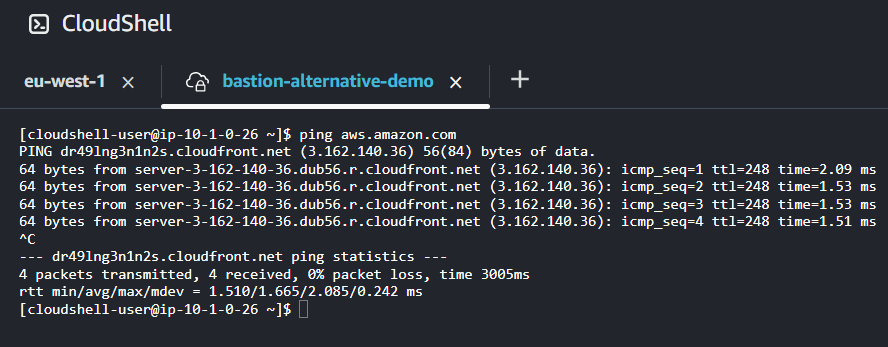
Let’s verify outbound connectivity:
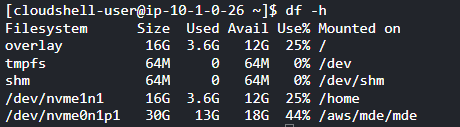
The /home partition has about 12GB free space. If you need more scratch space, look into mounting Amazon Elastic File System or dump stuff on Amazon S3. Keep in mind that the CloudShell volume is ephemeral and data will be gone after your session ends.
Let’s also check that Cloudshell’s Elastic Network Interface is in the expected private subnet. Thank you Amazon Q for the creative query suggestion.
aws ec2 describe-network-interfaces \
  --filters "Name=private-ip-address,Values=$(ip addr show ens6 | grep -oE '((1?[0-9][0-9]?|2[0-4][0-9]|25[0-5])\.){3}(1?[0-9][0-9]?|2[0-4][0-9]|25[0-5])' | head -n 1)" \
  --query 'NetworkInterfaces[*].{SubnetId:SubnetId}' \
  --output text | xargs -I {} aws ec2 describe-subnets --subnet-ids {} \
  --query 'Subnets[*].{SubnetId:SubnetId,Ipv4CidrBlock:CidrBlock,TagName:Tags[?Key==`Name`].Value|[0]}' --output table
Cloudshell has many development tools pre-installed, including a mysql client. To verify that the endpoint hostname resolves to a private ip address in the private subnet, install dig from bind-utils:
sudo yum install bind-utils -y
dig +short <hostname>
We successfully managed to connect to the RDS Aurora MySQL cluster and created a new database.
Alternative 3: AWS Cloud9 IDE
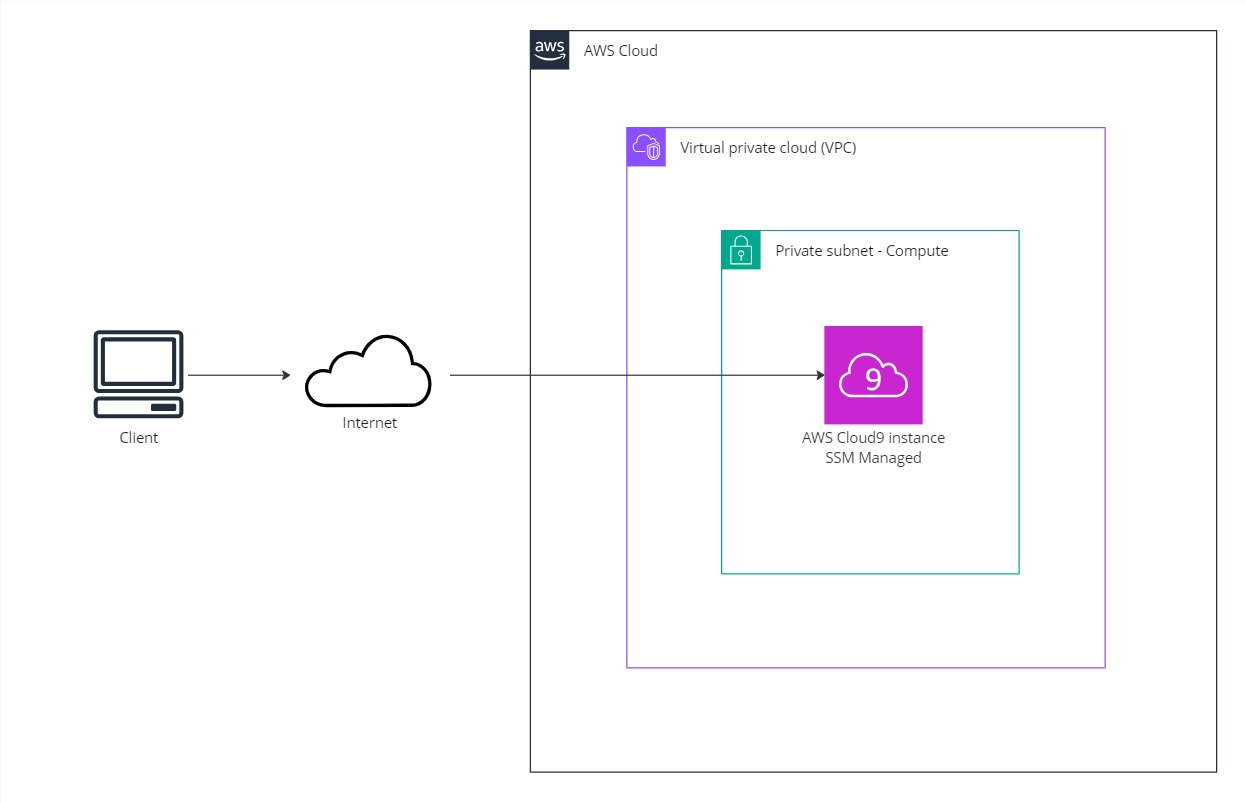
AWS Cloud9 is a cloud based integrated development environment (IDE) that can be accessed through the AWS Console. It could be an alternative if you prefer a lightweight client/workstation environment, where your development environment will be the configured the same across client devices.
Cloud9 is a fully managed service based on EC2 and EBS for persistent data storage. Instance hibernation takes place after a period if inactivity (configurable, from 30 minutes to x hours) to save costs when not in use. A Cloud9 environment can be deployed into both public and private subnets, in modes EC2 (recommended) or SSH (discouraged). The EC2 mode supports the “no-ingress instance” pattern, without the need to open any inbound ports, by leveraging AWS Systems Manager. This is the procedure we will explore further.
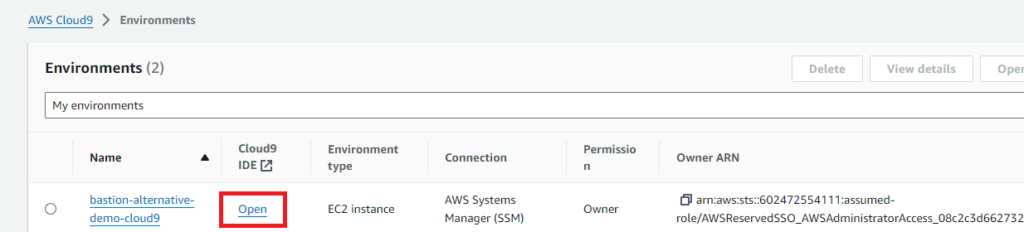
A sample Cloud9 instance has been provisioned as part of the Terraform sample module. Navigate to AWS Cloud9 in the AWS Console, locate “bastion-alternative-demo-cloud9” and click Open.
The EC2 environment type comes with AWS managed temporary credentials activated by default, which manages the AWS access credentials on the users behalf, with certain restrictions. To ensure you get all privileges available to the IAM policies for your active role session, disable this in the AWS Cloud9 main window, Preferences, AWS Settings, Credentials.
Open a Terminal tab and issue aws configure sso as in the previous example, and set the SSO session name “default”.
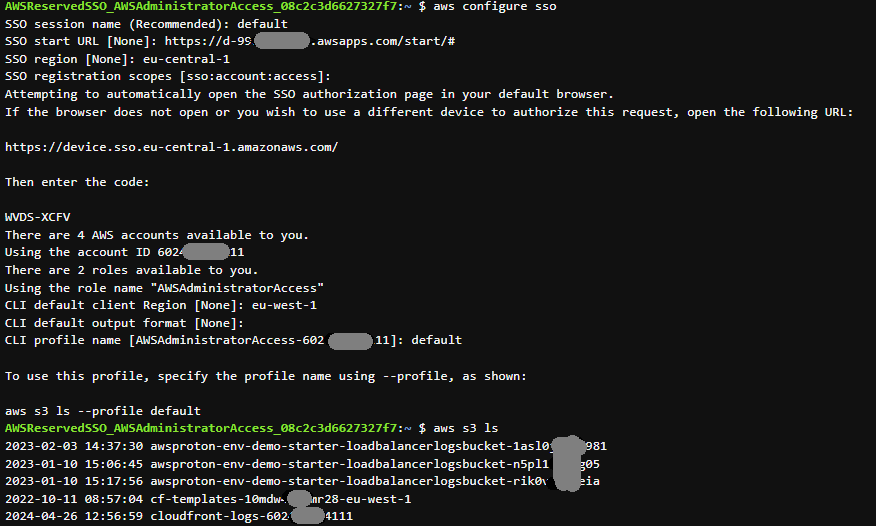
aws s3 ls verifies the AWS session. Technically, this could have been executed from “anywhere”, but the main benefit are:
- The Cloud9 environment maintains the configuration regardless of client device.
- Other resources on private subnets may be configured to be available.
Verify database connectivity:
Conclusion and feature comparison
In this blog post we explored alternative workflows which can replace the concept of a traditional Bastion Host accessed by SSH or RDP. AWS provides customers with alternatives so that you can choose the one that best fits your use-case.
| Alternative | Good | Not so good | Pricing |
| AWS Systems Manager – Session Manager | Provides easy access to any compute resource from the AWS Console or the AWS CLI with federation/AWS IAM Identity Center support. Supports port forwarding and local GUI clients. Full integration with Cloudtrail and CloudWatch Logs for auditing and activity tracking | All prerequisites for SSM Managed Instances may be seen as a hurdle, but can be solved with IaC. | No additional charges for accessing Amazon EC2 instances. The advanced on-premises instance tier is required for using Session Manager to interactively access on-premises instances. |
| AWS CloudShell VPC Environments | Available anywhere in the AWS Console. Does not require extensive configuration. Easy to use for quick commands or lookups. Ephemeral storage, auto-cleanup after session inactivity. | Ephemeral storage, auto-cleanup after session inactivity. Due to possible session timeout issues consider other options for long running commands, database imports/exports etc. Audit and activity logging capabilities not matching SSM Session Manager. | No additional charges, minimum fees nor commitments. You only pay for other AWS resources you use with CloudShell to create and run your applications. |
| AWS Cloud9 | Appealing if you’re also working on code development (application/IaC). Same IDE experience regardless of client device. Terraform/Cloudformation deployments can be triggered triggered from the same terminal. Data is persisted on EBS until environment termination. | Session/permission management can be cumbersome. Audit and activity logging capabilities not matching SSM Session Manager. | No additional charges, minimum fees nor commitments for the service itself. You pay only for the compute (EC2) and storage resources (EBS) for the environment. Example: t2.micro Linux instance at $0.0116/hour x 90 total hours used per month = $1.05 $0.10 per GB-month of provisioned storage x 10-GB storage volume = $1.00 Total monthly fees: $2.05 |
My personal preference is to pivot to immutability with containers and automation, but AWS Systems Manager – Session Manager would be the most viable alternative workflow for any remaining EC2 based workloads.
Instead of querying the database directly for troubleshooting or support requests, develop a support microservice or dashboard for the purpose. It could be as simple as SELECT * from relevant tables which returns relevant data in JSON format, with standard employee authentication and authorization mechanisms built in.
Full Terraform sample code is available at https://github.com/haakond/terraform-aws-bastion-host-alternatives, feel free to grab anything you need.