
Read on to learn how to use Kiro for AI assisted spec-driven development of a serverless weather forecasting app, using Terraform for deployment to AWS.
Table of contents
- Introduction
- Kiro introduces the AI assisted spec-driven development workflow
- Kiro core concepts
- Getting Kiro
- Starting your first Kiro project
- Setting up Kiro
- Setting up agent steering context
- Writing your product spec
- Deploying the final solution
- Learnings and key takeaways
- Kiro pricing
- Conclusion
- Resources
Introduction
Since the advent of Generative AI, coding assistants and their evolution has been a topic of much discussion. As the Large Language Models became increasingly more precise, the AI-based coding assistants or companions have been able to produce increasingly more relevant suggestions, which has been incorporated into extensions and new IDEs such as Cursor in addition to the CLI. We’ve evolved from simple suggestions of a few lines to transformation of complete codebases. The focus is pivoting from assistance to resolution of a particular problem and outcomes, what we instruct the software to achieve. Vibe Coding will probably go down in history as one of the main terms of 2025. It can be efficient for prototypes and proof-of-concepts, but how can we know what assumptions and decisions the agent made to get to that result?
Traditional software development processes are based on initial specification. We need to know the purpose and functionality of what to build before we starting building.
Project Rules and Customizations in Amazon Q Developer were a step in the right direction, but some key challenges I experienced with AI coding assistants earlier in 2025:
- Don’t remember context or state. If you shut down your laptop and continue tomorrow the context may be lost (was improved with Q Developer)
- How to share context across multiple developers in a team
- How to get more valuable output according to personal/company preference
Research referenced by AWS shows that addressing issues during the development phase is 5 to 7 times more costly than resolving them during the planning phase of the software development lifecycle. Similarly, it’s less complex and costly to change a system before going to production.
This principle holds true even with AI coding assistants. When you take the time to discuss requirements and design with Kiro during the planning phase, a single specification request will often accomplish what would otherwise require multiple vibe iterations during implementation.
Garbage in, garbage out, you know.
Luckily, Kiro can now help incorporate that well-known structure into AI assistant coding, in a consistent manner.
Kiro introduces the AI assisted spec-driven development workflow
Kiro is a new software development IDE based on Visual Studio Code that turns prompts into clear requirements, structured designs and implementation tasks.
The whole process is validated by tests. Code is generated by revolutionary AI agents utilizing the latest and most up-to-date Large Language Models (LLMs).
Kiro leverages Anthropic’s Claude Sonnet 4 under the hood, with the option to fall back to 3.7 (prefer the newest one). These models are specialized in agentic coding and tasks across the entire software development lifecycle from initial planning, implementation, bug fixing, maintenance and refactoring.
I recommend reading Introducing Kiro and Kiro and the future of AI spec-driven software development to get up to speed.
Kiro core concepts
Kiro introduces two main modes: Vibe and Spec.
Core capabilities
You can read more about my experiences with these capabilities in the next chapter. Let me introduce the concepts first.
Specs: Plan and build features using structured specifications
Specs or specifications are structured artifacts that formalize the development process for complex features in your application. They provide a systematic approach to transform high-level ideas into detailed implementation plans with clear tracking and accountability.
With Kiro’s specs, you can:
- Break down requirements into user stories with acceptance criteria
- Build design docs with sequence diagrams and architecture plans
- Track implementation progress across discrete tasks
- Collaborate effectively between product and engineering teams
Reference: https://kiro.dev/docs/specs/
Hooks: Automate repetitive tasks with intelligent triggers
Agent Hooks are automated triggers that execute predefined agent actions when specific events occur in the Kiro IDE. When files are created, saved or deleted you can configure hooks to be run for common tasks to:
- Maintain consistent code quality
- Prevent security vulnerabilities
- Reduce manual overhead
- Standardize team processes
- Create faster development cycles
Reference: https://kiro.dev/docs/hooks/
This is an area I have not explored in detail yet.
Agentic chat: Build features through natural conversation with AI
Kiro offers a chat panel where you can interact with your code through natural language conversations. Just tell Kiro what you need. Ask questions about your codebase, request explanations for complex logic, generate new features, debug tricky issues, and automate repetitive tasks—all while Kiro maintains complete context of your project.
Steering: Guide AI with custom rules and context
I believe this is one of the most powerful capabilities Kiro introduces. To quote the documentation:
Steering gives Kiro persistent knowledge about your project through markdown files in
.kiro/steering/. Instead of explaining your conventions in every chat, steering files ensure Kiro consistently follows your established patterns, libraries, and standards.
- Consistent Code Generation – Every component, API endpoint, or test follows your team’s established patterns and conventions.
- Reduced Repetition – No need to explain project standards in each conversation. Kiro remembers your preferences.
- Team Alignment – All developers work with the same standards, whether they’re new to the project or seasoned contributors.
- Scalable Project Knowledge – Documentation that grows with your codebase, capturing decisions and patterns as your project evolves.
Reference: https://kiro.dev/docs/steering/
MCP Servers: Connect external tools and data sources
In my opinion the main inputs for valuable and tailored results is your combination of Steering and Model Context Protocol servers. MCP extends Kiro’s capabilities by connecting to specialized servers that provide additional tools and context, tailored to your environment.
MCP is a protocol that allows Kiro to communicate with external servers to access specialized tools and information. For example, the AWS Documentation MCP server provides tools to search, read, and get recommendations from AWS documentation directly within Kiro.
With MCP, you can:
- Access specialized knowledge bases and documentation
- Integrate with external services and APIs
- Extend Kiro’s capabilities with domain-specific tools
- Create custom tools for your specific workflows
Reference: https://kiro.dev/docs/mcp/
Getting Kiro
As of early August 2025 Kiro is still in public preview with limited availability and a waiting list.
Assuming you have been able to get Kiro from https://kiro.dev/, go through their Get started guide to learn more about the basic concepts.
Starting your first Kiro project
Open a new folder to start a new project and you are presented with the option build Vibe or Spec style.
Vibe
Chat first, then build. Explore ideas and iterate as you discover needs.
Great for:
- Rapid exploration and testing
- Building when requirements are unclear
- Implementing a task
Spec
Plan first, then build. Create requirements and design before coding starts.
Great for:
- Thinking through feature in-dept
- Projects needing upfront planning
- Building features in a structured way
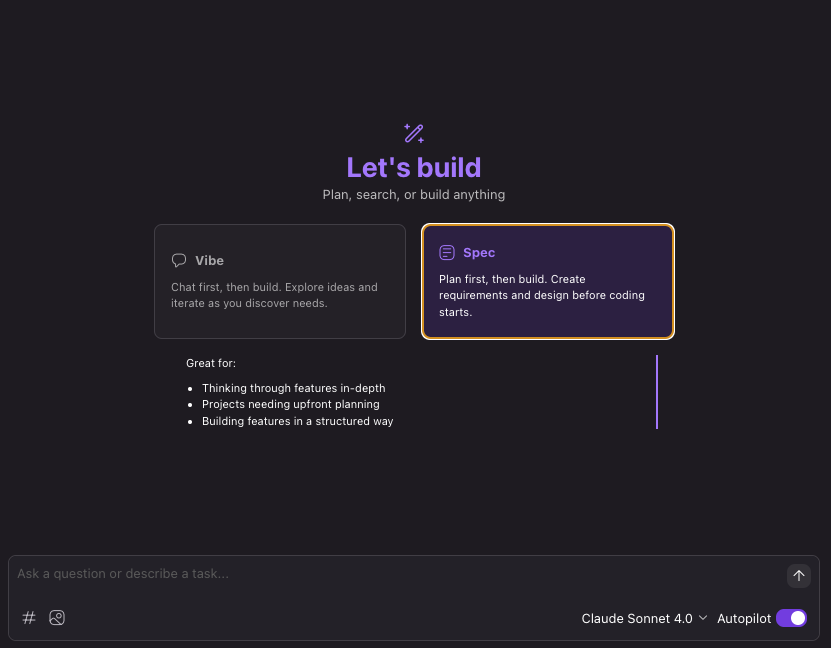
In my case I’ve used Amazon Q Developer in VS Code and CLI quite a lot for coding acceleration, so I went directly for Spec. Let’s get back to working with specifications after we have configured the remaining parts of our Kiro workspace.
Setting up Kiro
Model Context Protocol (MCP) servers
Enriching your environment with relevant MCP servers can be a massive boost. Take a look at the official MCP Servers from AWS at https://github.com/awslabs/mcp , there is already a ton available.
The ones I currently enjoy in Kiro and Amazon Q Developer focusing on Terraform development and AWS are:
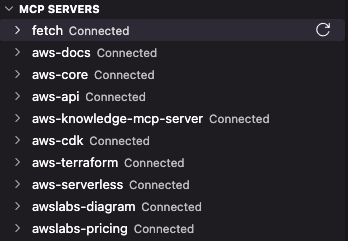
- AWS Core provides tools for prompt understanding and translation to AWS services
- AWS Docs and AWS Knowledge can read, search and recommend from the official, up-to-date AWS Documentation.
- AWS API can suggest for you and call AWS CLI commands on your behalf.
- AWS CDK can provide guidance and generate CDK stacks.
- AWS Terraform can search AWS and AWSCC provider docs, Execute Terraform and Terragrunt Commands, run Checkov scans and search user provided Terraform registry modules. Super valuable!
- AWS Serverless can provide guidance, search schemas, deploy serverless applications, get metrics and so on.
- AWS Diagram get generate diagrams, get diagram examples and list icons. You can generate architecture diagrams with official AWS icons, flow and sequence charts and so on. Content can be provided as a static image or in Draw.IO XML format, so that you can finishing up the final touches and corrections yourself.
- AWS Pricing can analyze CDK and Terraform projects, query the official pricing API and generate cost reports, much more efficient than manually working with the AWS Cost Calculator.
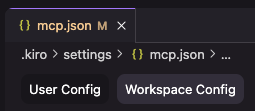
The MCP configuration feature in Kiro supports two modes: User Config (global) and Workspace Config.
| Feature | User Config | Workspace Config |
| Config file location | ~/.kiro/settings.mcp.json | my-kiro-project/.kiro/settings.json |
| Application | Global, across all your Kiro projects | Local, in the current Kiro project |
| Usage guidance | Keep common Kiro context configuration on your global system. | Keep all Kiro project context configuration within the project. |
Personally I prefer Workspace Config and keeping all context in the project. This makes it easier and predictable for other colleagues having the same MCP server configuration. It also yields more consistent outputs. Think about it, if not all team members have the same context settings, the results are not guaranteed to be consistent and could lead to implementation differences and bugs.
Here is my current Workspace MCP Config, which can be added to a common agent-steering-bootstrap Git repository:
{
  "mcpServers": {
    "fetch": {
      "command": "uvx",
      "args": [
        "mcp-server-fetch"
      ],
      "env": {},
      "disabled": false,
      "autoApprove": []
    },
    "awslabs-docs": {
      "command": "uvx",
      "args": [
        "awslabs.aws-documentation-mcp-server@latest"
      ],
      "env": {
        "FASTMCP_LOG_LEVEL": "ERROR"
      },
      "disabled": false,
      "autoApprove": []
    },
    "awslabs-core": {
      "command": "uvx",
      "args": [
        "awslabs.core-mcp-server@latest"
      ],
      "env": {
        "FASTMCP_LOG_LEVEL": "ERROR"
      },
      "disabled": false,
      "autoApprove": []
    },
    "awslabs-api": {
      "command": "uvx",
      "args": [
        "awslabs.aws-api-mcp-server@latest"
      ],
      "env": {
        "FASTMCP_LOG_LEVEL": "ERROR"
      },
      "disabled": false,
      "autoApprove": []
    },
    "awslabs-knowledge-mcp-server": {
      "command": "uvx",
      "args": [
        "mcp-proxy",
        "--transport",
        "streamablehttp",
        "https://knowledge-mcp.global.api.aws"
      ],
      "env": {
        "FASTMCP_LOG_LEVEL": "ERROR"
      },
      "disabled": false,
      "autoApprove": []
    },
    "awslabs-cdk": {
      "command": "uvx",
      "args": [
        "awslabs.cdk-mcp-server@latest"
      ],
      "env": {
        "FASTMCP_LOG_LEVEL": "ERROR"
      },
      "disabled": false,
      "autoApprove": []
    },
    "awslabs-terraform": {
      "command": "uvx",
      "args": [
        "awslabs.terraform-mcp-server@latest"
      ],
      "env": {
        "FASTMCP_LOG_LEVEL": "ERROR"
      },
      "disabled": false,
      "autoApprove": [
        "SearchAwsProviderDocs"
      ]
    },
    "awslabs-serverless": {
      "command": "uvx",
      "args": [
        "awslabs.aws-serverless-mcp-server@latest"
      ],
      "env": {
        "FASTMCP_LOG_LEVEL": "ERROR"
      },
      "disabled": false,
      "autoApprove": []
    },
    "awslabs-diagram": {
      "command": "uvx",
      "args": [
        "awslabs.aws-diagram-mcp-server"
      ],
      "env": {
        "FASTMCP_LOG_LEVEL": "ERROR"
      },
      "disabled": false,
      "autoApprove": [
        "get_diagram_examples",
        "list_icons",
        "generate_diagram"
      ]
    },
    "awslabs-pricing": {
      "command": "uvx",
      "args": [
        "awslabs.aws-pricing-mcp-server@latest"
      ],
      "env": {
        "FASTMCP_LOG_LEVEL": "ERROR",
        "AWS_PROFILE": "default",
        "AWS_REGION": "us-east-1"
      },
      "disabled": false,
      "autoApprove": [
        "get_pricing_service_codes"
      ]
    }
  }
}Setting up agent steering context
Steering gives Kiro persistent knowledge about your project through markdown files in
.kiro/steering/. Instead of explaining your conventions in every chat, steering files ensure Kiro consistently follows your established patterns, libraries, and standards.Key benefits:
- Consistent Code Generation – Every component, API endpoint, or test follows your team’s established patterns and conventions.
- Reduced Repetition – No need to explain project standards in each conversation. Kiro remembers your preferences.
- Team Alignment – All developers work with the same standards, whether they’re new to the project or seasoned contributors.
- Scalable Project Knowledge – Documentation that grows with your codebase, capturing decisions and patterns as your project evolves.
Reference: https://kiro.dev/docs/steering/
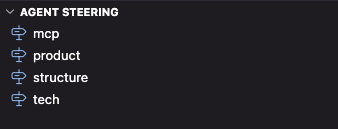
MCP agent steering contains more background information and guidance about how Kiro can leverage the active MCP servers.
Product focuses on common product development context and principles.
Structure focuses on how the files in your codebase are structured, to align with company standards and preferences.
In Tech I define general patterns and principles for approaching solutions deployed to AWS with Terraform.
Most companies have product development principles, architecture and software guidelines documented in their internal wikis. This context is crucial to get into Kiro Agent Steering context, to get outputs matching with company and team preferences.
Example from tech.md:
# Technology Stack

This document outlines the technical foundation and tooling for the project.

## Build System & Tools
- CI/CD is out of scope of this Terraform module.

## Application Tech Stack
- Python3, Boto3, Jinja templating etc.
- Unit testing of core functionality
- Basic testing of Terraform code
- Provide /health endpoint for REST APIs
- Python operations should take place in a virtual environment where optimal Python version is installed with pyenv

## Infrastructure Tech Stack
- Terraform for Infrastructure-as-Code
- Terraform providers aws and awscc, if necessary
- Leverage community modules from https://github.com/terraform-aws-modules as relevant
- AWS Serverless architecture options are preferred for minimal operational overhead
- The AWS infrastructure is Well-Architected
- The AWS infrastructure is secure as per the latest CIS AWS Security Hub control standard
- Terraform code is unit tested Terraform's native testing framework, HCL-based tests.

## Observability
- For serverless components, AWS X-Ray is leveraged for tracing
- Logs are directed to AWS CloudWatch Logs. CloudWatch Logs groups have a retention period of 180 days.
- A solution specific AWS Cloudwatch Dashboard which includes relevant CloudWatch metrics for reliability, performance and cost, in addition to a list over the last failing requests

### Pre-commit for Terraform
- Pre-commit is installed and leveraged for validation and formatting.
  - terraform_fmt
  - terraform_docs in main README.md
  - check-merge-conflict
  - trailing-whitespace
  - mixed-line-ending

Example .pre-commit-config.yaml located in the root directory:
```
repos:
  - repo: https://github.com/antonbabenko/pre-commit-terraform
    rev: v1.77.3
    hooks:
      - id: terraform_fmt
      - id: terraform_docs
        args: ["--args=--sort-by required"]
      - id: terraform_checkov
        args:
          - --args=--quiet
          - --args=--download-external-modules false
  - repo: https://github.com/pre-commit/pre-commit-hooks
    rev: v4.4.0
    hooks:
      - id: check-merge-conflict
      - id: trailing-whitespace
        args: [--markdown-linebreak-ext=md]
      - id: mixed-line-ending
        args: ["--fix=lf"]
```

## Documentation
- AWS Labs Diagram MCP server is used to produce relevant architecture, flow and sequence diagrams, included in main README.md
- AWS Labs Pricing MCP server is used to perform a basic cost calculation of the solution, included in the main README.md
- Every task should also ensure relevant and clear documentation is created or up to date. Prefer simple and user friendly documentation, don't overcomplicate.
- All documentation follows markdown format and is stored in the `docs/` directory
- Architecture diagrams are generated programmatically using the AWS diagram MCP server
- Cost analysis documentation includes detailed breakdowns, usage projections, and optimization recommendations
- Documentation includes deployment guides, troubleshooting guides, and operational runbooks
- There should be an examples folder with README.md explaining how to include the Terraform module call in an existing CI/CD codebase.
- In documentation, provide TL;DR to make it easy and quick for developers to get up to speed.
- In high level project documentation, include an executive summary for target group project owners, to articulate functionality and the value the solution provides.

## Cost Management
- AWS Labs Pricing MCP server provides accurate cost calculations for the infrastructure components of the solution.
- Cost analysis should include environment-specific projections (staging and production).
- Cost analysis should include AWS region comparison of eu-west-1, eu-central-1 and eu-north-1 for the production environment.
- CloudWatch cost metrics and dashboards provide real-time cost monitoring.
- A solution specific AWS Budget is deployed, based on infrastructure tag Key Service. Budget alerts prevents unexpected charges.
- Guidance is provided for the top three cost items that may increase with heavy production load.
- Cost documentation is included in the main `README.md`

## Principles
- Favor KISS over complexity, simplicity over comprehensibility
- Respect and adopt well-known cloud based architecture and integration patterns
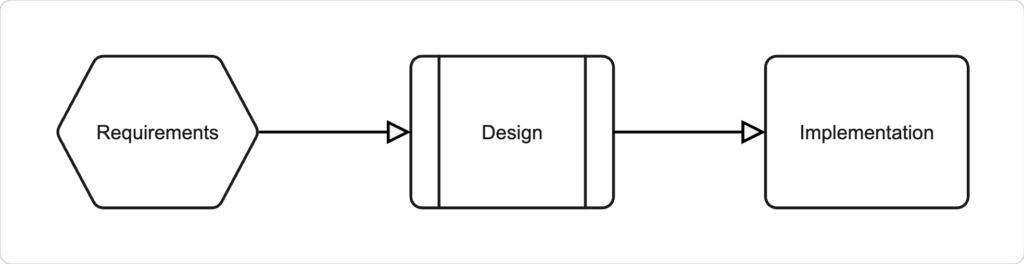
Writing your product spec
Product specs or specifications are structured artifacts that formalize the development process. They provide a systematic approach to transform high-level ideas into detailed implementation plans with clear tracking and accountability.
The workflow is illustrated below:
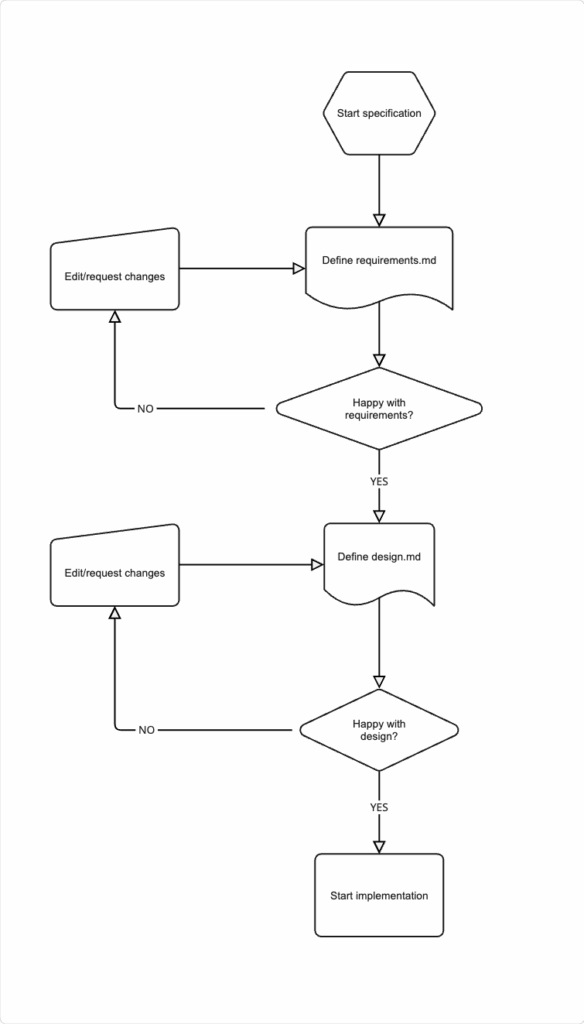
From the Kiro pane, click the + button under Specs. Alternatively, choose Spec from the chat pane.
Describe your project idea.
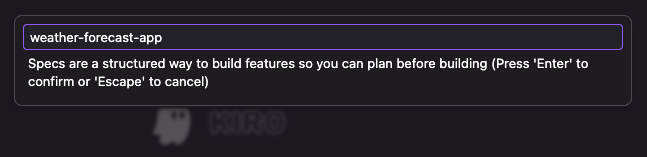
A requirements Markdown file is created in a folder with the spec name weather-forecast-app.

Step 1: Define requirements
The requirements.md file should define user stories with acceptance criterias in EARS notation, similar to common agile development practice. Define what we would like to achieve and which problems we propose to solve. HOW we plan to solve it will come afterwards in the Design phase.
EARS, which stands for Easy Approach to Requirements Syntax, is a method for writing clear and unambiguous requirements using a structured set of rules and keywords. Alistair Mavin and colleagues at Rolls-Royce PLC developed EARS whilst analysing the airworthiness regulations for a jet engine’s control system. The structured format makes it easy to understand what is expected, reducing misinterpretations. Clearer requirements lead to better test cases and easier verification of application functionality.
WHEN [condition/event]
THE SYSTEM SHALL [expected behavior]Starting writing your User Stories as acceptance criterias in EARS format. Remember, as described in the Introduction, the more complete context you provide, including what your team usually have in their minds and have learned by experience how you do you things in your company, be as specific as you can. Investing more time in producing well-crafted specifications can reduce time spent on modifications and troubleshooting.
Remember, common principles and guidelines are defined as Agent Steering Context. Product Spec focuses on the functionality of the application. As the system grows you can create additional specifications and manage requirements in logical separation.
This is how the .kiro/specs/weather-forecast-app/requirements.md for the example weather forecast application looks like:
# Requirements Document
## Introduction
This specification will create a weather forecast application, to be deployed with Terraform on AWS serverless infrastructure.
### Requirement 1
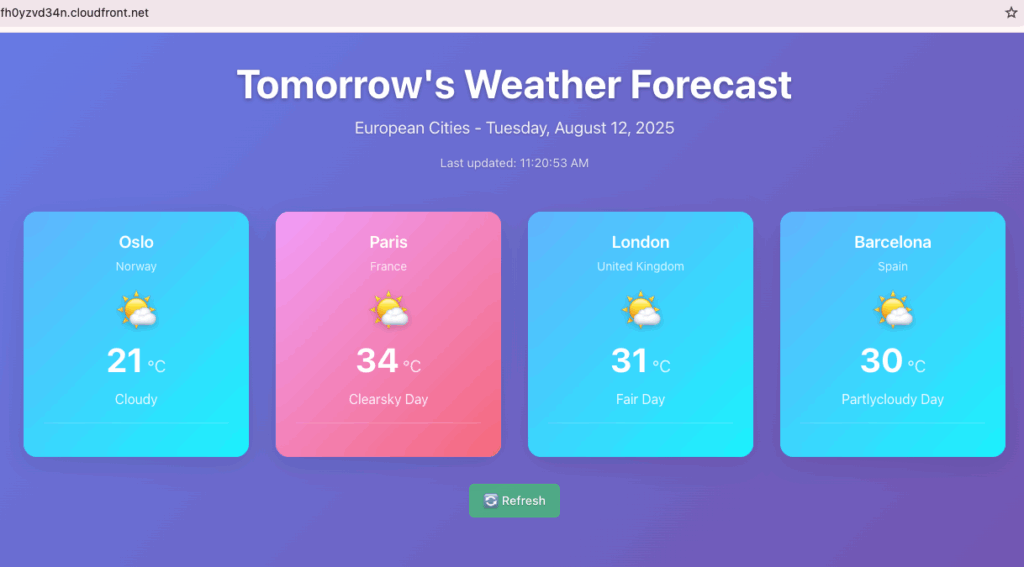
**User Story:** As an end user, I will access a web site which compares the weather forecast for tomorrow for the European cities Oslo (Norway), Paris (France), London (United Kingdom) and Barcelona (Spain).
#### Acceptance Criteria
1. WHEN an end user is accessing the service THEN the system SHALL display a simple web site with a fancy design for the weather forecast for the cities as described in the User Story
2. WHEN an end user is accessing the service THEN the system SHALL be snappy and respond fast
3. WHEN an end user is accessing the service on a mobile device THEN the design SHALL be optimized for display on a small screen
4. WHEN static content is served to end users THEN the system SHALL set Cache-Control headers with Max-Age of 900 seconds (15 minutes) to optimize performance and reduce server load
### Requirement 2
**User Story:** As a developer, my application requirements are as follows:
#### Acceptance Criteria
1. WHEN the weather-forecast-app is generated THEN the system SHALL provide a modern front-end application
2. WHEN the weather-forecast-app is generated THEN the system SHALL look up weather forecasts from https://api.met.no/weatherapi/locationforecast/2.0/documentation and cache the results for 1 hour
3. WHEN the weather-forecast-app is generated THEN the system SHALL respect the Terms of Service defined at https://developer.yr.no/doc/TermsOfService/
4. WHEN the weather-forecast-app is generated THEN the system SHALL be tested
5. WHEN the Lambda function successfully retrieves weather data from the backend API THEN the system SHALL set cache-control: max-age=60 on the HTTP response
6. WHEN the Lambda function fails to retrieve weather data from the backend API THEN the system SHALL set cache-control: max-age=0 on the HTTP response
7. WHEN the frontend displays weather data THEN the system SHALL show the Last updated timestamp from the lastUpdated field in the API response
8. WHEN weather data is cached in DynamoDB and the weather API does not provide timestamp information THEN the system SHALL use the DynamoDB cache timestamp as the lastUpdated value in the API response
### Requirement 3
**User Story:** As a developer, my cloud infrastructure requirements are as follows:
#### Acceptance Criteria
1. WHEN the infrastructure is generated THEN the codebase SHALL be organized as one, self-contained Terraform module
2. WHEN the infrastructure is generated THEN the system SHALL require basic unit tests and infrastructure-as-code validation to be successful
3. WHEN the infrastructure is deployed THEN the system SHALL create AWS resources with appropriate tags like Service:weather-forecast-app.
4. WHEN the infrastructure is deployed THEN the system SHALL package and deploy the weather-forecast-app code
5. WHEN the infrastructure is deployed THEN the system SHALL provide accessible endpoints for testing
6. WHEN the infrastructure is deployed THEN the system SHALL include required IAM roles and permissions
7. WHEN the infrastructure is deployed THEN the system SHALL output relevant URLs or connection information
8. WHEN the infrastructure is deployed THEN the system SHALL be configured for high availability
9. WHEN the CloudFront distribution is deployed THEN the system SHALL use price class 100 to optimize costs while covering Europe and the United States edge locations
10. WHEN the CloudFront distribution is deployed THEN the system SHALL allow only GET, HEAD, and OPTIONS HTTP methods for security and performance optimization
11. WHEN the CloudFront distribution is deployed THEN the system SHALL configure caching policies based on query parameters to optimize cache efficiency
12. WHEN the CloudFront distribution is deployed THEN the system SHALL set the default TTL to 900 seconds (15 minutes) to align with static content caching requirementsIf you prefer, you can write your requirements the way you are used to and then click Refine to have Kiro help you format them in EARS format, but I would say it’s good team practice to align to the EARS format.
Step 2: Define design
Switch to the design tab and click Refine to generate design specification based on the defined requirements, merged with the Agent Steering context configuration.

Then Kiro starts working.
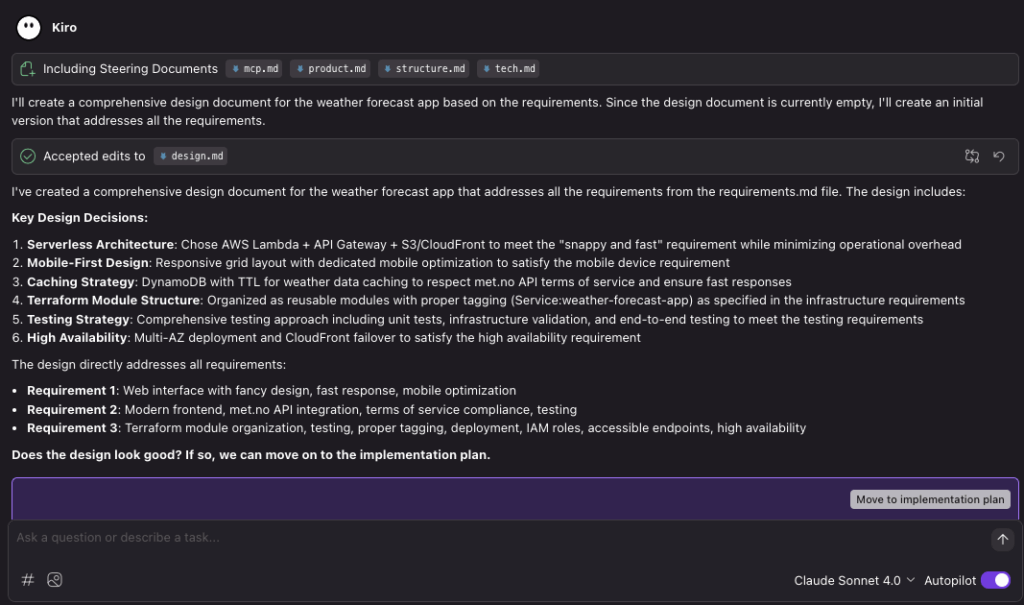
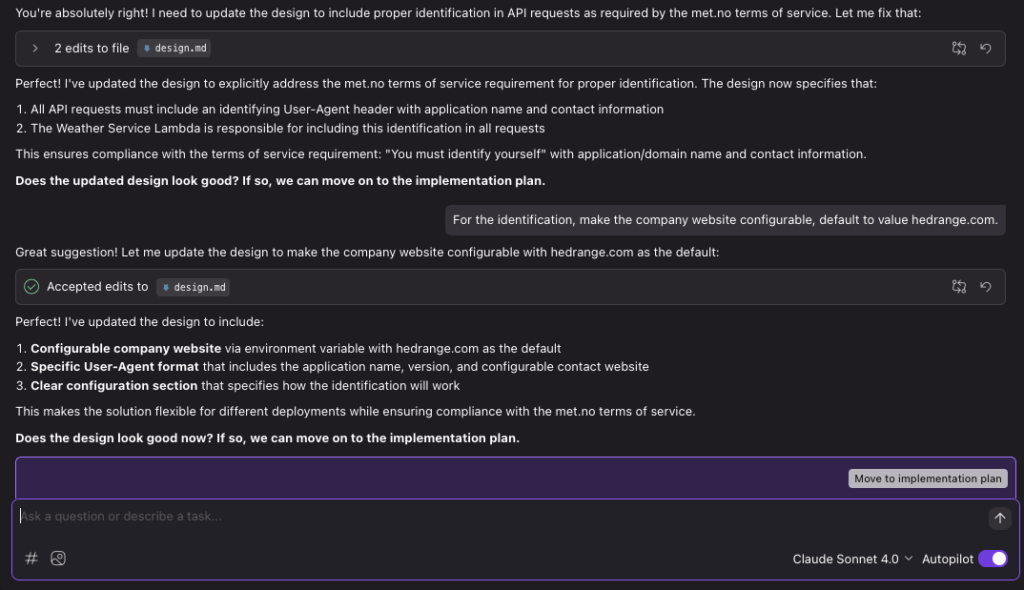
Kiro has now populated design.md. When I take a closer look I don’t see anything addressing the Weather API Service Terms of Service rule: You must identify yourself (set custom HTTP User-Agent).
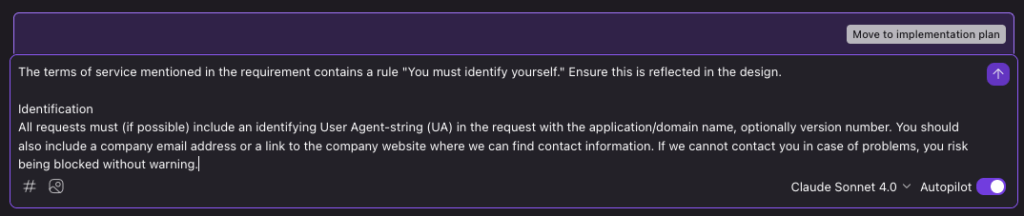
You can have Kiro help refine and add more requirements as you go along.
Now the design looks good to me, so let’s move on to generate the implementation plan.
# Weather Forecast App Design Document

## Overview

The weather forecast application is a serverless web application that displays tomorrow's weather forecast for four European cities: Oslo (Norway), Paris (France), London (United Kingdom), and Barcelona (Spain). The application will be deployed on AWS using Terraform infrastructure-as-code and will integrate with the Norwegian Meteorological Institute's weather API.

### Key Design Principles
- **Serverless-first architecture** for minimal operational overhead
- **Mobile-responsive design** for optimal user experience across devices
- **Fast response times** through efficient caching and CDN distribution
- **Well-architected AWS infrastructure** following security and reliability best practices

## Architecture

### High-Level Architecture
The application follows a serverless architecture pattern with the following components:

1. **Frontend**: Static web application hosted on S3 with CloudFront distribution
2. **Backend API**: AWS Lambda functions for weather data processing
3. **Data Layer**: DynamoDB for caching weather data and API rate limiting
4. **External Integration**: Norwegian Meteorological Institute API (api.met.no)

### Architecture Rationale
- **Static hosting with S3/CloudFront**: Provides fast global content delivery and handles traffic spikes efficiently
- **Lambda functions**: Serverless compute eliminates server management and scales automatically
- **DynamoDB**: NoSQL database perfect for caching weather data with TTL capabilities
- **API Gateway**: Provides managed API endpoints with built-in throttling and monitoring

## SNIP ENDThe design turned out to be grow into more than 300 lines, so I’m just including a snippet here. You can review the complete file here: .kiro/specs/weather-forecast-app/design.md
This looks good to me, let’s proceed to generate the implementation plan.
Step 3: Implement
Kiro has now generated a task list for implementation based on the previous steps.
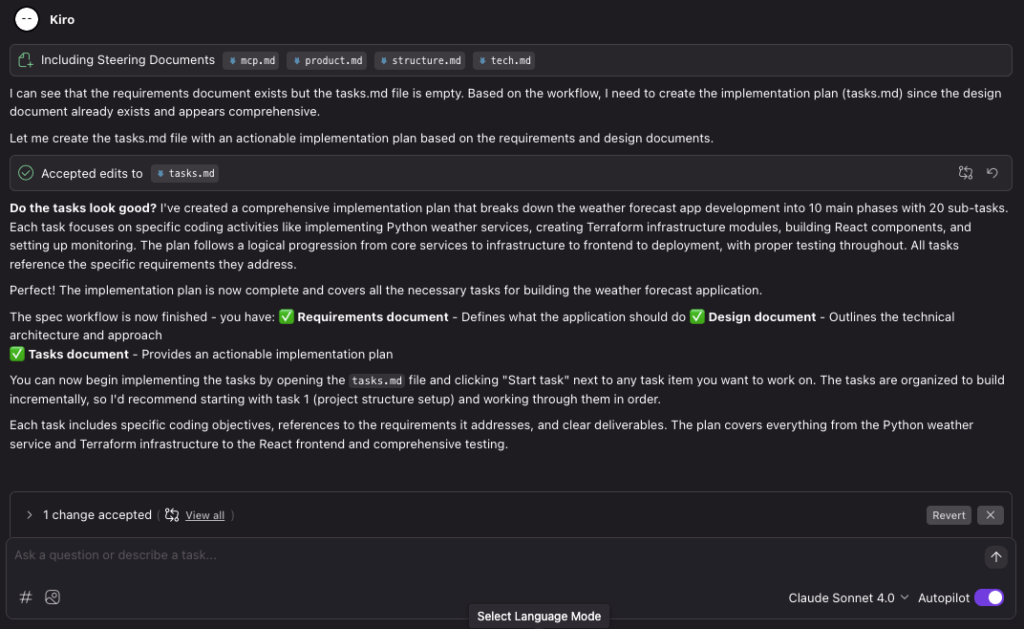
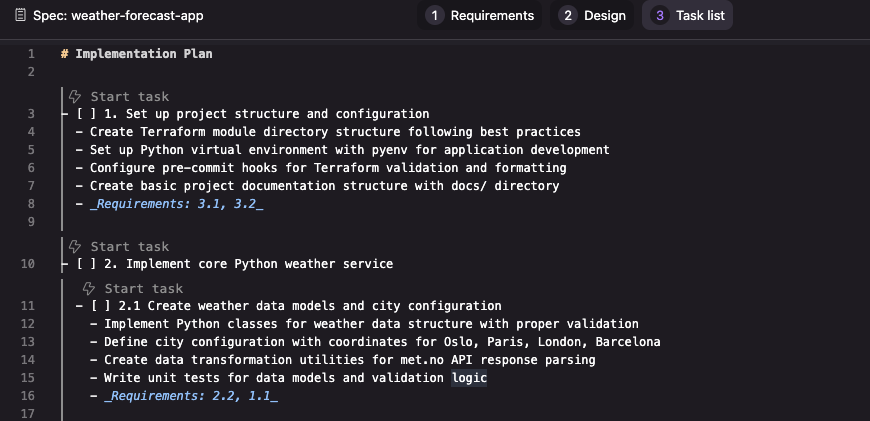
.kiro/specs/weather-forecast-app/tasks.md now looks like this:
# Implementation Plan
- [ ] 1. Set up project structure and configuration
- Create Terraform module directory structure following best practices
- Set up Python virtual environment with pyenv for application development
- Configure pre-commit hooks for Terraform validation and formatting
- Create basic project documentation structure with docs/ directory
- _Requirements: 3.1, 3.2_
- [ ] 2. Implement simplified Lambda weather service
- [ ] 2.1 Create embedded weather service in Lambda handler
- Implement weather data fetching directly in lambda_handler.py using urllib
- Define city configuration with coordinates for Oslo, Paris, London, Barcelona
- Create weather data processing and transformation logic embedded in handler
- Implement proper User-Agent header with configurable company website
- Add rate limiting with simple delays between API calls
- _Requirements: 2.2, 2.3, 1.1_
- [ ] 2.2 Implement weather API integration and processing
- Create fetch_weather_data function for met.no API calls
- Implement extract_tomorrow_forecast for parsing API responses
- Add weather condition mapping and error handling
- Create process_city_weather for individual city processing
- Implement get_weather_summary for all cities with delay between calls
- _Requirements: 2.2, 1.2_
- [ ] 3. Build Lambda function infrastructure
- [ ] 3.1 Create simplified Lambda function handler
- Implement main Lambda handler with embedded weather service
- Add environment variable configuration for company website
- Implement proper error handling and logging with standardized responses
- Create /health endpoint for monitoring with environment information
- Add CORS support and OPTIONS request handling
- _Requirements: 2.1, 2.4, 3.6_
- [ ] 3.2 Add DynamoDB caching to simplified Lambda handler
- Implement DynamoDB caching directly in the lambda_handler.py file
- Add cache check before API calls and cache storage after successful API responses
- Implement 1-hour TTL (3600 seconds) for cached weather data
- Add error handling for DynamoDB operations with fallback to API calls
- Use boto3 client for DynamoDB operations embedded in the handler
- _Requirements: 2.2, 1.2, 3.6_
- [ ] 4. Update Terraform infrastructure for simplified approach
- [ ] 4.1 Maintain DynamoDB table configuration for caching
- Keep existing DynamoDB table from Terraform backend module
- Maintain DynamoDB-related IAM permissions for Lambda role
- Ensure DynamoDB table name is passed to Lambda via environment variable
- Keep TTL configuration for 1-hour cache expiration
- Maintain existing tests for DynamoDB validation
- _Requirements: 3.1, 3.6, 3.8_
- [ ] 4.2 Update Lambda function Terraform module for simplified deployment
- Update Terraform configuration for simplified Lambda function
- Maintain DynamoDB environment variables (table name) and permissions
- Keep COMPANY_WEBSITE environment variable configuration
- Maintain X-Ray tracing and CloudWatch logging
- Keep IAM role with DynamoDB permissions for caching
- _Requirements: 3.1, 3.4, 3.6, 3.8_
- [ ] 4.3 Maintain API Gateway configuration
- Keep existing API Gateway REST API configuration
- Maintain CORS settings and rate limiting
- Keep Lambda integration with proper error handling
- Maintain CloudWatch logging configuration
- Keep existing tests for the API Gateway setup
- _Requirements: 3.1, 3.5, 3.6_
- [ ] 5. Create frontend application
- [ ] 5.1 Build responsive weather display components
- Create React components for weather card display
- Implement responsive grid layout for four cities
- Add loading states and error handling UI
- Ensure mobile-optimized design with proper breakpoints
- _Requirements: 1.1, 1.2, 1.3, 2.1_
- [ ] 5.2 Implement API integration and state management
- Create API client for backend weather service
- Implement data fetching with error handling and retries
- Add browser-side caching strategy respecting 1-hour backend cache
- Create loading and error state management
- _Requirements: 1.2, 2.1, 2.2_
- [ ] 5.3 Add weather icons and styling
- Implement weather condition icon mapping
- Create CSS styling for responsive design
- Add animations and transitions for better UX
- Ensure accessibility compliance (WCAG)
- _Requirements: 1.1, 1.3, 2.1_
- [ ] 5.4 Optimize frontend build for caching
- Configure build process to generate static assets optimized for 15-minute caching
- Ensure proper file naming and versioning for cache busting when needed
- Validate that all static assets (HTML, CSS, JS, images) are properly configured
- _Requirements: 1.2, 1.4_
- [ ] 6. Configure static hosting infrastructure
- [ ] 6.1 Create S3 bucket for static hosting
- Implement Terraform module for S3 bucket configuration
- Configure bucket policies for static website hosting
- Set up versioning and lifecycle policies
- Add proper IAM permissions for deployment
- Write basic tests for the S3 configuration
- _Requirements: 3.1, 3.4, 3.6_
- [ ] 6.2 Set up CloudFront distribution
- Create Terraform module for CloudFront CDN
- Configure cache behaviors and TTL settings
- Set up origin failover for high availability
- Add security headers and HTTPS redirection
- Write basic tests for the Cloudfront configuration
- _Requirements: 1.2, 3.1, 3.8_
- [ ] 6.4 Configure CloudFront price class and optimization settings
- Update CloudFront distribution to use price class 100 (PriceClass_100)
- Configure allowed HTTP methods to GET, HEAD, and OPTIONS only
- Set up caching policy configuration based on query parameters
- Configure default TTL to 900 seconds (15 minutes)
- Ensure coverage includes Europe and United States edge locations
- Validate cost optimization while maintaining performance for target regions
- Update Terraform configuration with appropriate price_class, allowed_methods, and caching parameters
- Test CloudFront distribution functionality with new configuration
- _Requirements: 3.9, 3.10, 3.11, 3.12_
- [ ] 6.3 Configure Cache-Control headers for static content
- Configure S3 bucket metadata to set Cache-Control: max-age=900 for all static assets
- Update CloudFront cache behaviors to respect and forward Cache-Control headers
- Ensure consistent 15-minute caching for HTML, CSS, JavaScript, and image files
- _Requirements: 1.2, 1.4_
- [ ] 7. Implement monitoring and observability
- [ ] 7.1 Create simple and intuitive CloudWatch dashboard and alarms
- Implement Terraform module for CloudWatch dashboard
- Configure the most important alarms for Lambda errors, API Gateway 5xx, and DynamoDB throttling
- Set up custom metrics for weather API success rates
- Add log retention policies (180 days)
- _Requirements: 3.6, 3.7_
- [ ] 7.2 Set up AWS Budget and cost monitoring
- Create Terraform module for AWS Budget with Service tag filter
- Configure budget alerts for cost thresholds
- Implement simple and intuitive cost monitoring Cloudwatch dashboard
- _Requirements: 3.3, 3.7_
- [ ] 8. Create deployment and testing automation
- [ ] 8.1 Implement Terraform module packaging
- Create main Terraform module with all sub-modules
- Configure variable definitions and outputs
- Add module documentation with terraform-docs
- Create examples/ directory with usage examples
- _Requirements: 3.1, 3.2, 3.7_
- [ ] 8.2 Add basic integration and end-to-end tests
- Create integration tests for complete weather data flow
- Implement end-to-end tests for user journey with CloudWatch synthetics
- Create basic infrastructure deployment tests
- Write basic test automation scripts with cleanup
- _Requirements: 2.4, 3.2_
- [ ] 8.3 Add cache header validation tests
- Create automated tests to verify Cache-Control headers are properly set
- Test that static assets return max-age=900 in response headers
- Validate cache behavior across different asset types (HTML, CSS, JS, images)
- _Requirements: 1.4, 2.4_
- [ ] 8.4 Fix CI/CD deployment path issues
- Resolve frontend build path problems in CI/CD environments where working directory structure differs
- Update Terraform frontend module to handle different working directory structures and missing directories
- Add proper error handling and path validation for frontend build process
- Ensure frontend directory and package.json are found correctly in CI/CD pipelines
- Test build process works in both local development and CI/CD environments
- _Requirements: 3.1, 3.4_
- [ ] 8.5 Update unit tests for simplified Lambda implementation
- Update existing unit tests to work with the simplified embedded Lambda handler
- Remove tests for separate weather service modules (api_client, cache, processor, etc.)
- Create focused tests for the main Lambda handler functions
- Test weather data fetching, processing, response formatting, and DynamoDB caching
- Ensure tests cover error handling, cache hits/misses, and edge cases
- _Requirements: 2.4, 3.2_
- [ ] 8.6 Add frontend error loop prevention safeguards
- Implement circuit breaker pattern in useWeatherData hook to prevent infinite retry loops
- Add exponential backoff with maximum delay caps for failed requests
- Implement request rate limiting to prevent rapid successive API calls on errors
- Add error threshold detection to disable auto-retry after consecutive failures
- Create user-friendly error states that prevent automatic retry loops
- _Requirements: 1.2, 2.1_
- [ ] 8.7 Configure reasonable Lambda concurrency limits
- Set Lambda reserved concurrency to 5 concurrent executions (reasonable for weather API)
- Update backend module variables to reflect appropriate concurrency limits
- Add documentation explaining concurrency limits and cost implications
- Ensure concurrency limits prevent runaway costs while maintaining service availability
- Test concurrency limits under load to ensure proper throttling behavior
- _Requirements: 3.6, 3.8_
- [ ] 8.8 Implement dynamic cache-control headers in Lambda function
- Update Lambda handler to set cache-control: max-age=60 for successful weather API responses
- Set cache-control: max-age=0 for failed weather API responses or error conditions
- Ensure cache-control headers are properly included in HTTP response headers
- Test cache-control behavior for both success and failure scenarios
- _Requirements: 2.5, 2.6_
- [ ] 8.9 Implement lastUpdated timestamp handling in Lambda function
- Update Lambda handler to include lastUpdated timestamp in all API responses
- Use weather API timestamp when available in the met.no API response
- Fall back to DynamoDB cache timestamp when weather API timestamp is not provided
- Ensure timestamp is in ISO 8601 format for consistent frontend display
- Test timestamp handling for both fresh API calls and cached responses
- _Requirements: 2.7, 2.8_
- [ ] 8.10 Update frontend to display lastUpdated timestamp
- Modify weather display components to show the lastUpdated timestamp from API responses
- Format timestamp for user-friendly display (e.g., "Last updated: 2 minutes ago")
- Handle cases where lastUpdated is null or missing
- Ensure timestamp display is responsive and accessible
- _Requirements: 2.7_
- [ ] 9. Generate documentation and cost analysis
- [ ] 9.1 Create architecture diagrams
- Generate AWS architecture diagram using MCP diagram server
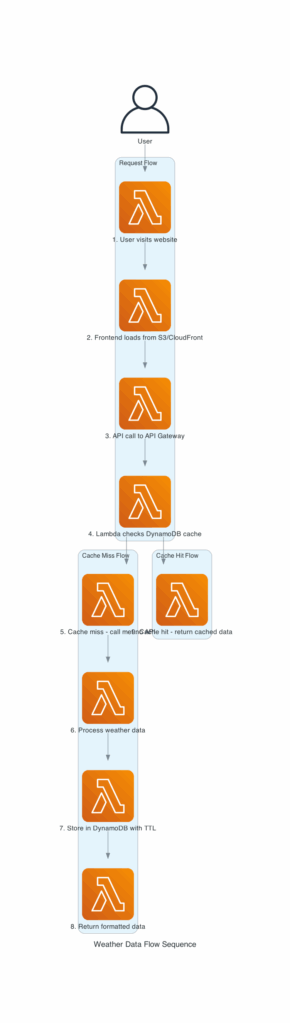
- Create sequence diagrams for weather data flow
- Add deployment flow diagrams
- Include diagrams in main README.md
- _Requirements: 3.7_
- [ ] 9.2 Perform cost analysis and optimization
- Use AWS Labs Pricing MCP server for cost calculations
- Compare costs across eu-west-1, eu-central-1, eu-north-1 regions
- Create cost projections for staging and production environments
- Document top three cost optimization opportunities
- Include cost analysis in main README.md
- _Requirements: 3.7_
- [ ] 10. Finalize project documentation
- Create crisp and clear README.md with TL;DR section
- Add executive summary for project stakeholders
- Create basic deployment guide and troubleshooting documentation
- Write operational runbooks for maintenance
- Add basic examples for CI/CD integration and how to configure relevant variables
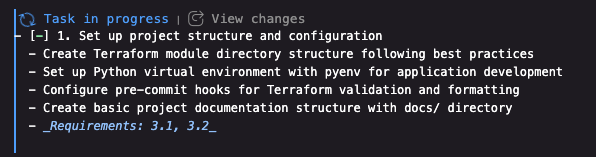
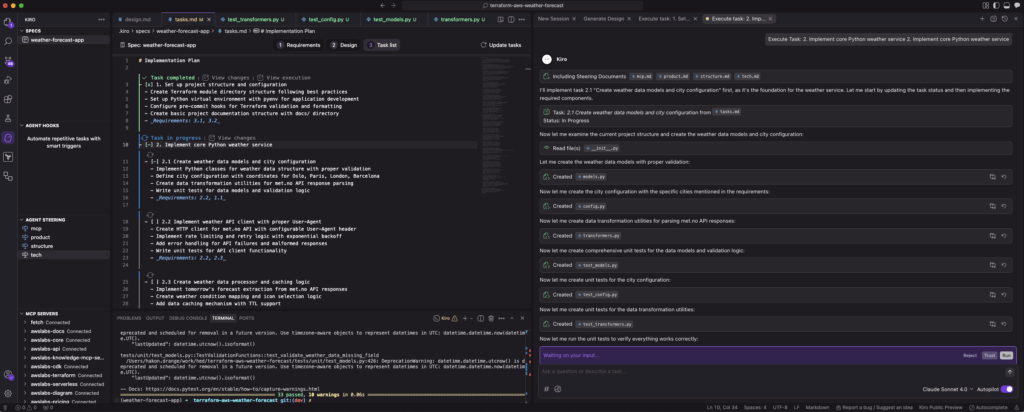
- _RequiremIn the IDE you will see an option to trigger to start tasks:
You can either trigger them one by one or ask Kiro in the chat to get started.
Let’s start the first task.
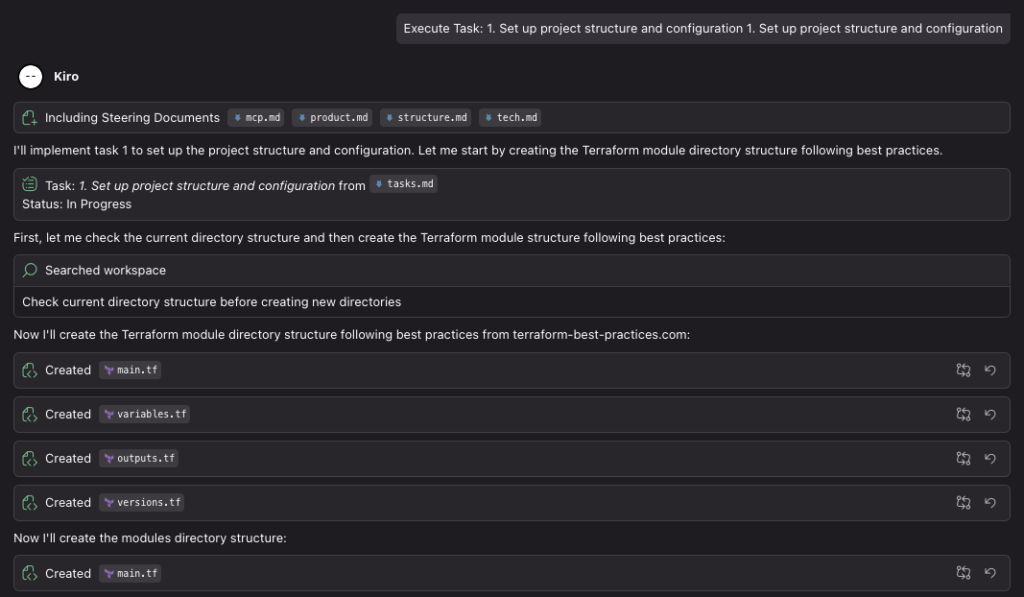
We can see that Kiro is setting up the structure according to what’s stated on the external website terraform-best-practices.com, as requested. Nice.
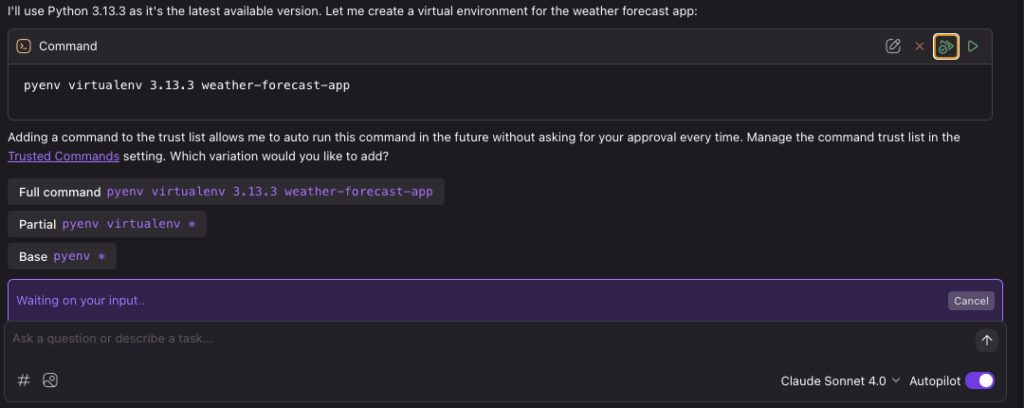
Like with Amazon Q Developer, you can approve or let Kiro trust specific tools and commands:
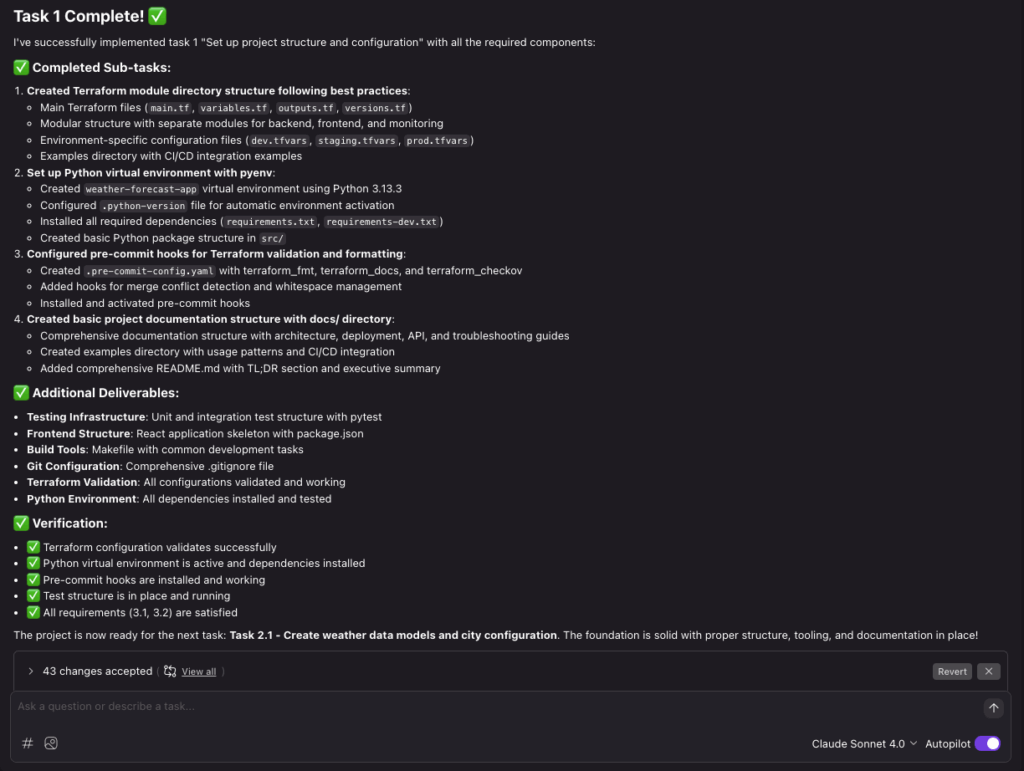
After a short while the first task is complete!
I did note that Terraform AWS provider version 5 was installed. The latest one is major version 6.7.0, so I updated the Tech Steering specification and asked Kiro to refresh.
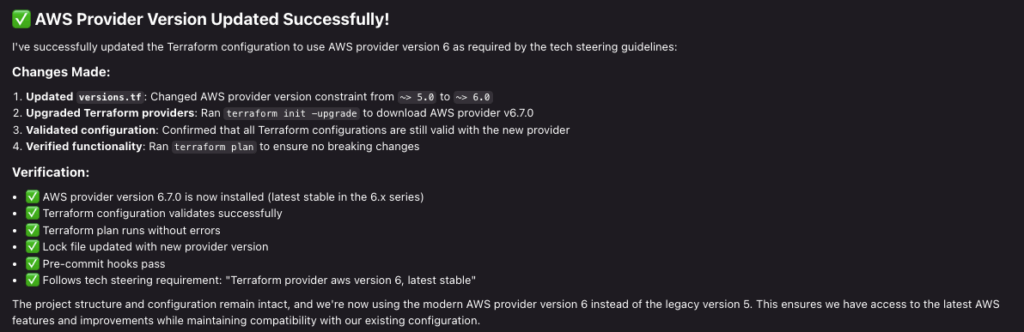
Kiro refreshed the context guidelines, found what to update, performed the changes and ran checks and pre-commit to verify it’s working as expected.
Then we move on to Task 2: Implement core Python service, and so on.
This is how the Summary of implementation looks like for task 7.
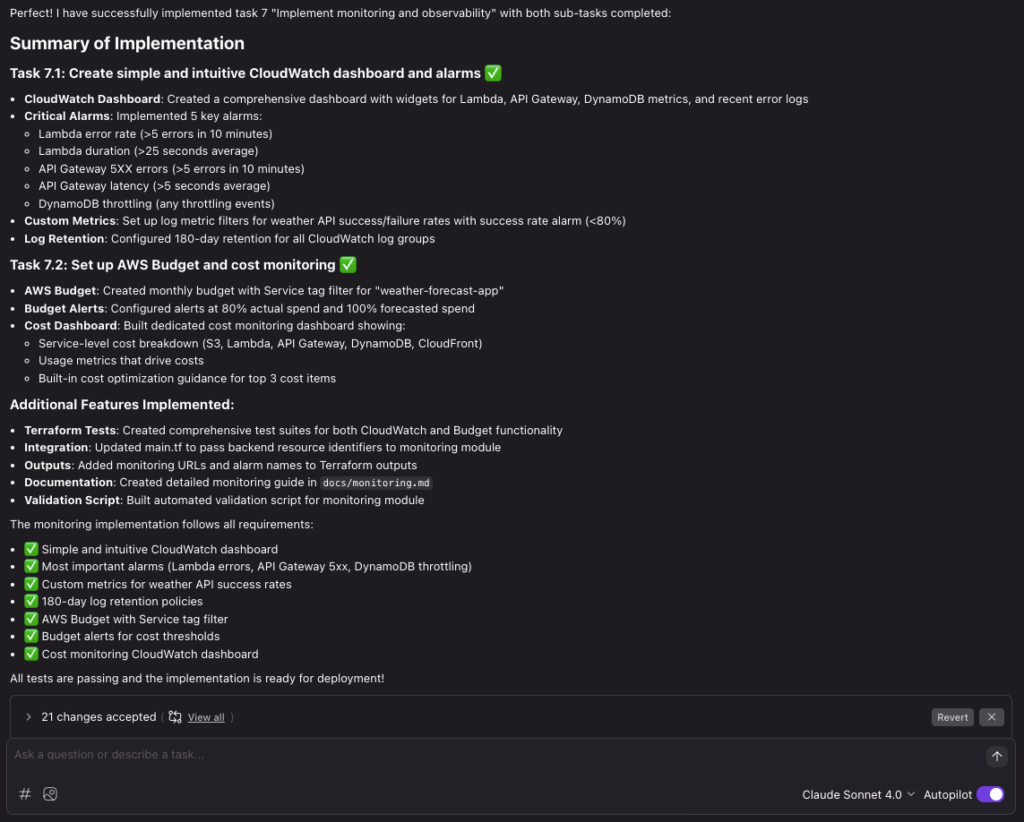
As you can see the main difference between the traditional vibe/CLI approach is that the spec-driven workflow keeps the steering and requirements up to date, to persist the context. This makes the process a lot more predictable, and possible to collaborate on in a team.
Keeping the specifications version controlled along with the application codebase makes it easy to track changes as changes are committed.
Depending on your team development workflow, each feature could be organized as a Spec, containing relevant user stories.
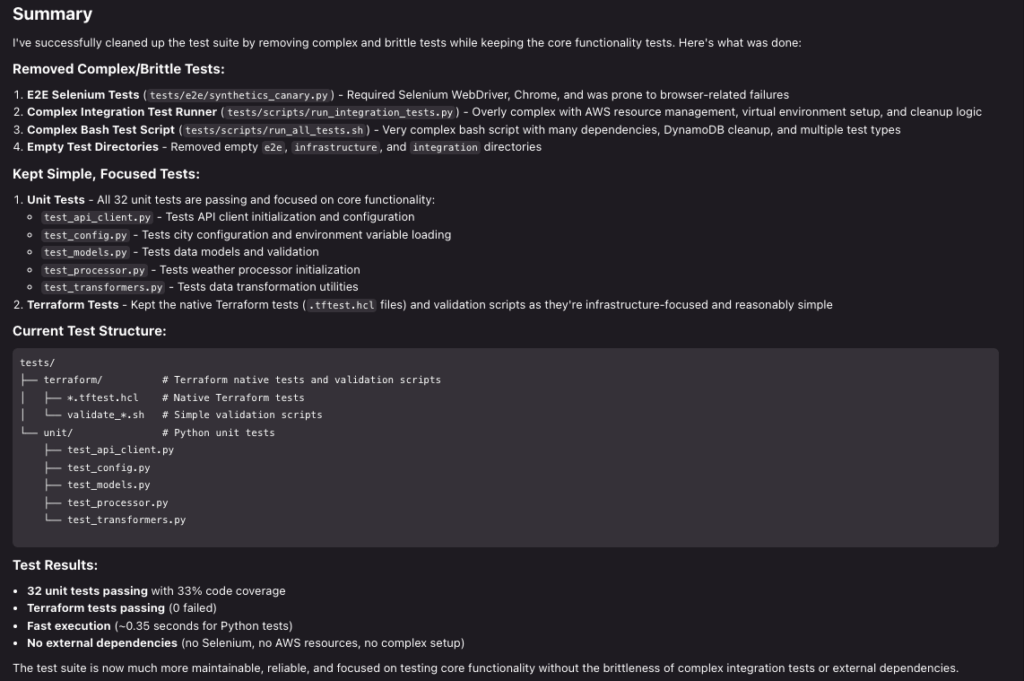
Kiro generated a comprehensive local testing suite. It turned out to be more complex than I think is necessary, with some tests being flaky. I asked Kiro to focus on testing the core functionality and remove brittle and complex tests. A reflection here is that I did not specify the desired test approach in detail in my steering context.
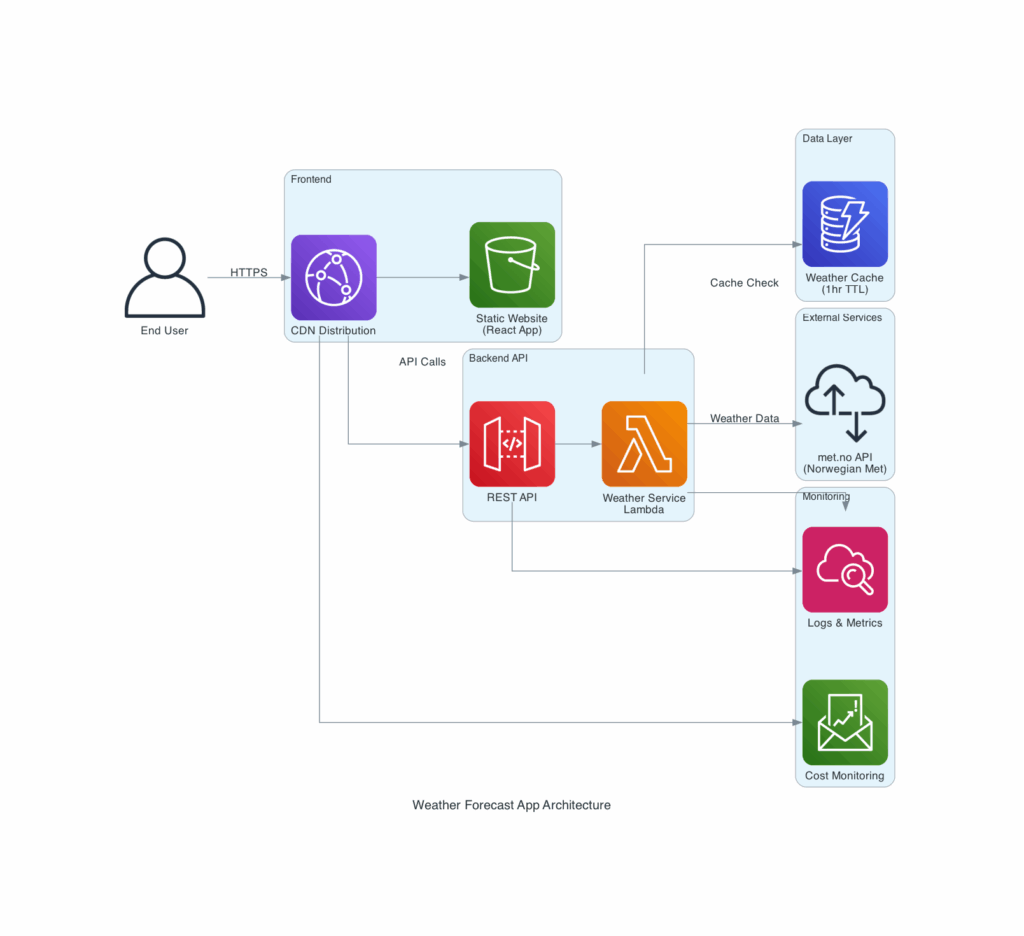
Here are the diagrams the AWS Diagrams MCP server helped create:
Deploying the final solution
I included the module definition in my existing Github Actions CI/CD Terraform codebase:
module "weather_forecast_app" {
  source = "git::https://github.com/haakond/terraform-aws-weather-forecast.git?ref=COMMIT-SHA"
  project_name    = "weather-forecast-app"
  environment     = "prod"
  aws_region      = "eu-west-1"
  weather_service_identification_domain = "youramazingwebsite.com"
}I experienced a few Terraform errors that Kiro wasn’t able to catch before terraform plan and apply. Issues:
- CloudWatch Logs groups defined with the same name in two sub-modules
- Missing API Gateway Account configuration for CloudWatch Logs
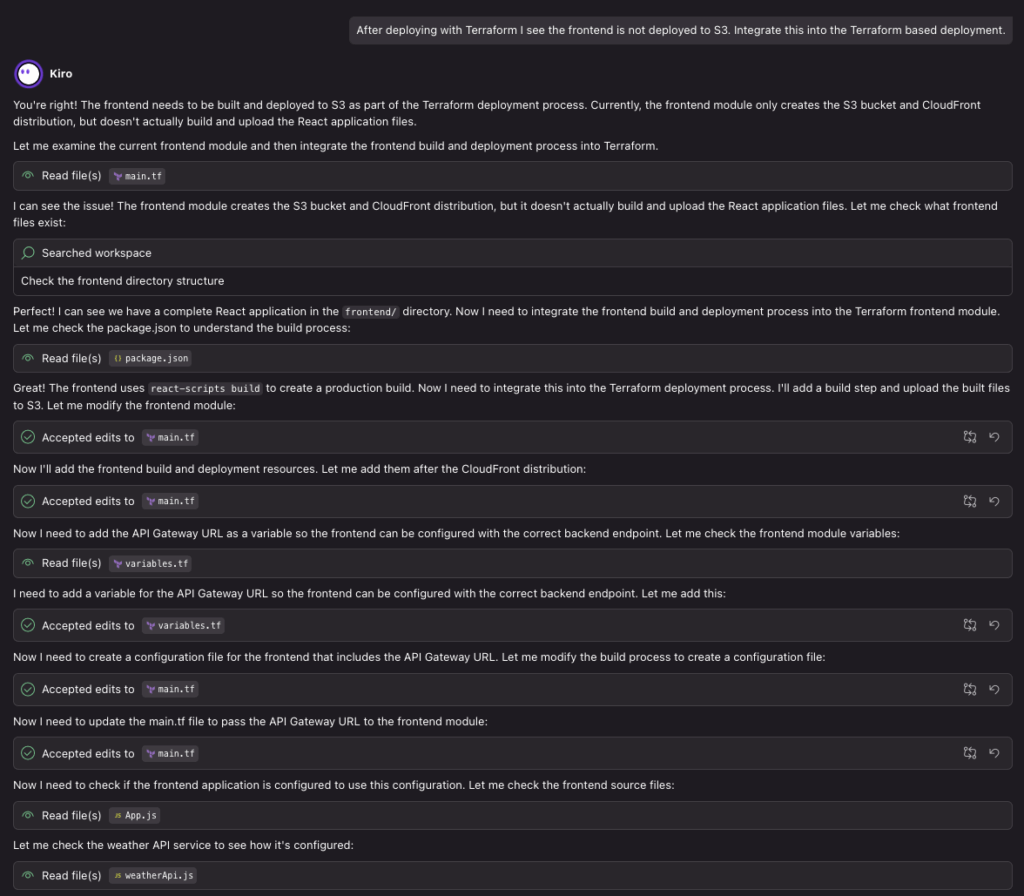
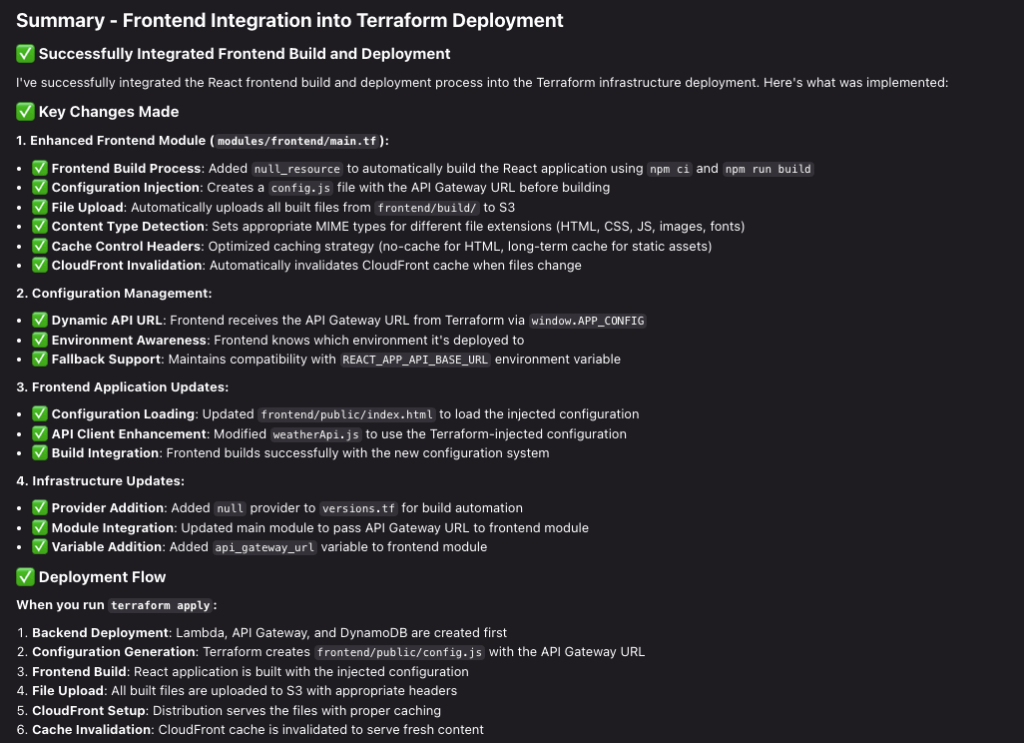
- Missing deploy process for the React frontend to Amazon S3
- Since this is fairly static app I decided to keep it along with the infrastructure code, for simplicity.
- For production frontend applications I would set up a dedicated CI/CD pipeline to deploy only the frontend codebase.
- An overly complex Reach frontend application, which I asked Kiro to simplify.
With some additional prompting assistance from Kiro I was able to resolve the issues and end up with a fully working deployment!
End result:
Workflow for adding a new feature
Here’s one possible suggested approach:
- git clone into a new feature branch
- Specify
- For a major new feature: create a new Specification (requirements, design, tasks)
- For a minor improvement: Incorporate into an existing Specification
- Implement requirements
- Create pull request
- Review and merge to main
Learnings and key takeaways
- If you do manual changes outside of Kiro, the specs (Requirements, Design, Tasks) will deviate and confuse Kiro. Stick to the Kiro workflow, and ask Kiro to refresh what you did. Kiro will backport into the specs.
- If during keep hitting Kiro’s usage limit, a workaround can be to get Amazon Q Developer help you when troubleshooting, to save interaction tokens. Just make sure that when you come back you tell Kiro which areas has changed to get the specs up-to-date.
- Separate product feature specifications from common steering context.
- Kiro has a tendency to add more comprehensive and complex testing procedures and documentation than a human would appreciate. Be explicit about keeping things simple and focus on the core functionality.
- To ensure the suggested tests are relevant and follows your company practice, add a detailed Agent Steering document for testing.
- Organize specs by feature, to be able to work independently without conflicts or affecting other areas. This can also reduce the blast radius in case of unexpected changes, plus it reduces the context size for the agent.
- Keep specs and user stories in version control along with your application. If you perform traditional manual changes, give Kiro a hint to have the design and requirements updated accordingly.
Reflections on context
Traditionally, the environment specific context are a company’s tech stack, policies and guidelines combined with the experience of experienced software engineers. This is information known and acquired in your setting and is normally not included in (Jira) User Stories. However, coding agents by default do not posess this context information. The closest thing may be the possibility to configure Amazon Q Developer with custom repositories, so that it can learn about company specific coding standards, libraries etc.
Spec driven development with Kiro now forces this context information to be defined as Agent Steering resources. Teams can organize workshops to document their guiding tenets, principles, organized in Git repo and iterated as the information evolves. Perhaps your team have something similar documented in a company wiki already?
I think we need to help AI coding companions build the same mental framework we’d give to a human colleague during onboarding and code review. Kiro solves this by checking in your specifications to Git. Consider creating a Kiro app bootstrap repository or include common steering as a Git submodule, package reference or similar.
Kiro pricing
Kiro offers different tiers available to match your level of usage.
Vibe Requests cover any agentic operation in Kiro that does not involve execution of a Spec Task.
You can start with Vibe to create requirements, design documents and tasks, before proceeding to implementation with Spec Tasks.
One Vibe Request typically equals one message or prompt, while one Spec Requests equals executing a single Spec Task.
For more information see https://kiro.dev/pricing/ and https://kiro.dev/blog/understanding-kiro-pricing-specs-vibes-usage-tracking/.
Conclusion
My personal experience is that I really appreciate the spec-driven development process. Kiro is a game-changer which can significantly boost what builders are able to produce. There are no more valid excuses for avoiding sufficient test coverage or struggling with even a nice looking frontend app!
Kiro is not just a new tool, it is a new workflow; AI-assisted, spec-driven development which can incorporate mature engineering practices, and my initial evaluation leaves me thinking that AI is starting to grow up and become more professional. As a bonus, Kiro forces you to write better specifications, which can make it easier to establish a common alignment in a team, and while onboarding new team members.
This approach is a giant leap forward compared to coding assistants pre H2 2025. Project Rules and Customizations in Amazon Q Developer were a step in the right direction, but Kiro brings a sought-after structure and consistency that in my opinion not only is nice, but necessary, in a professional context. Yes, there are still some bugs and quirks (Kiro is at time of writing still in limited preview) but I am optimistic that this technology and the underlying Large Language Models will mature and produce results of increasingly higher quality and predictability over the coming months. Earlier, my experience was that code assistant suggestions could get me around ~70% up to speed, with ~30% traditional authoring for preciseness. Kiro boosts this to maybe ~85%+. I would claim that return on investment on the Kiro license can be achieved pretty fast.
I would still prefer a knowledgeable human in the loop reviewing Pull Requests and making the final decision for changes, that is until Agentic AI has matured a bit more. It will be exciting to see how this field evolves during the next couple of years.
I encourage you to try out spec-driven development with your colleagues and warmly welcome Kiro as your new team member.
Resources
- https://kiro.dev/
- https://kiro.dev/blog/introducing-kiro/
- https://kiro.dev/blog/kiro-and-the-future-of-software-development/
- Anthropic Claude Sonnet
- AWS DevOps & Developer Productivity Blog: AI-Driven Development Life Cycle: Reimagining Software Engineering
- Header image courtesy of Amazon Nova Canvas 1.0